


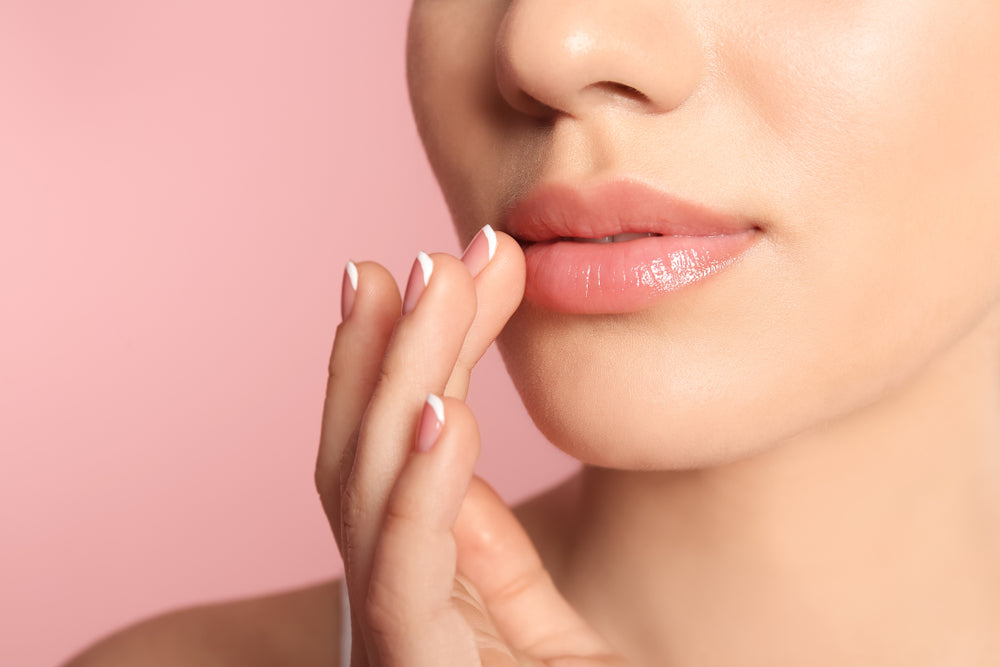
The Ultimate Lip Care Guide for a Nourished Pout
Our favorite look for low-effort glam calls for just a touch of mascara and a swipe of boldly colored lipstick. Focusing on the lips is a known French beauty hack, but for it to work well, our lips have to be in great shape!
Lipstick can’t glide smoothly over chapped lips, which is why a good lip care routine is so important. Here are our tips for taking good care of your lips on the regular, along with some advice for special care when they get especially dry.
Use a richer lip balm at night

The lips can get incredibly dry at night, especially if the humidity in your room is low or if you tend to breathe from your mouth as you sleep. That’s why it’s best to apply a thicker lip balm before bed. If your lips are particularly chapped, using a rich balm will help to speed up their healing.
Look for occlusive ingredients
What on earth does occlusive mean, you ask? Occlusives are oily ingredients that are able to seal moisture in place and prevent evaporation. They’re essential for a truly healing lip balm. Our favorite occlusive ingredients for the lips are lanolin, squalane, shea butter, and petrolatum. A balm with these ingredients can create a protective seal over the lips that prevents moisture loss.
Use lip balm as a barrier
Another important time to apply lip balm is before brushing your teeth or using potentially-drying skincare products like retinoids or acne treatments. The balm will act as a barrier against those products and prevent their drying effects from impacting your lips.
Layer your lip moisturizers
When the situation is particularly dire, especially in winter, it can be beneficial to build up moisture in the lips with layers. First, start with a light layer of fragrance-free lotion or hydrating serum – once it sinks in, layer a heavy lip balm on top. That first layer will add hydration, while the second layer will lock the moisture in deeply.
Opt for an SPF balm in the day
 Our lips are just as susceptible to sun damage as the rest of our skin, so during the daytime, opt for an SPF lip balm. Apply it to your lips at least 20 minutes before going out in the sun, and make sure they’re thoroughly coated. If you’d like to wear lipstick or gloss, just add it over the lip balm, and you’ll actually end up with a smoother finish than if you were to apply it to bare lips.
Avoid minty fragrances
We love a lip balm with a bit of flavor, but minty lip balms can actually cause some issues. Menthol is the key fragrance compound in mint essential oil, and it’s added to lip balms to give a cooling and stimulating effect. Unfortunately, those stimulating effects can also be drying and irritating, especially to already chapped lips.
However, when your lips are well taken care of, you can actually benefit from the temporary stimulating effect of menthol because it can make the lips look plump and full. That’s why we do use a bit of menthol in our lip-plumping Polynesie Francaise glosses.
Use a sulfate-free toothpaste
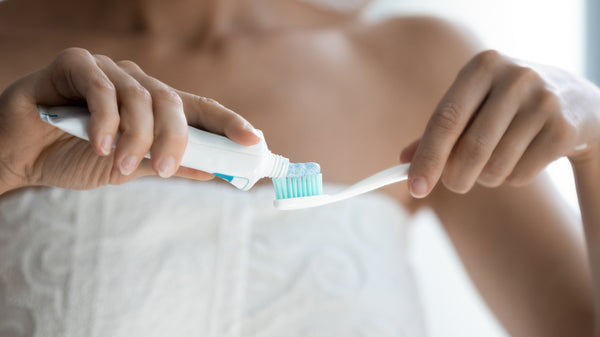
All toothpaste can be a little drying, but toothpaste made with sulfates is the worst by far. Sulfates (usually sodium lauryl sulfate) are the ingredients responsible for your toothpaste foaming up.
Unfortunately, they can also be quite drying and irritating, especially to the lips and gums. If you suffer from chronically dry lips, it’s very possible that your toothpaste is at fault, so switching to a non-foaming, sulfate-free toothpaste can make a big difference.
Exfoliate your lips
The final aspect of keeping the lips luscious and smooth is exfoliating them regularly. Exfoliation removes the flaky buildup of dead skin over the lips and allows lip moisturizers to do their job more effectively.
Exfoliation can be done as a dry lip treatment when they’re a little chapped or flakey, but if they’re so chapped that the skin is a little broken, it’s important to wait until they heal.
You also don’t want to over-exfoliate your lips. Once or twice a week is ideal, more often than that, and you risk irritating the skin and making things worse.
Make a DIY lip scrub
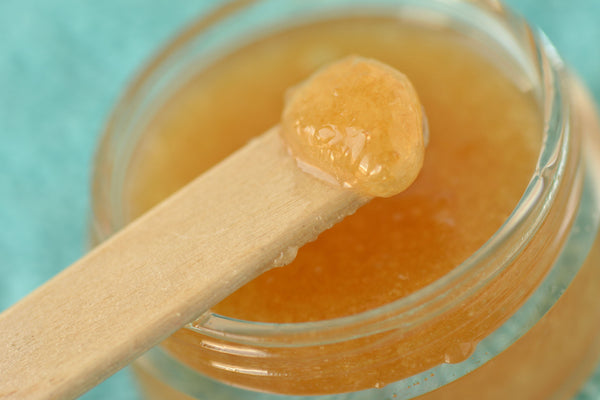
While you can certainly purchase a lip scrub at the store, making your own natural blend is safe and easy!
All you need is half a teaspoon of brown sugar and a few drops of coconut or olive oil. You can mix them up in a little jar or even in the palm of your hand. You can use honey instead of oil if your skin is acne-prone.
With your finger, rub the blend over your lips for a few seconds until they feel smooth. Finally, wipe it off or rinse it away with some water. The oil will help moisturize your lips, while the sugar will slough away all of the flakiness!
Just make sure to mix up a small amount every time you want to exfoliate. Unlike commercial products made with preservatives, whatever you make at home is liable to spoil after a few days.
Always prep before lipstick
No matter which of our lip care tips you choose to adopt, always remember to take a few steps to pamper your lips before applying lipstick. You’ll need to make sure there are no flakey patches or dryness before starting your makeup, or else you’ll end up with patchy-looking lipstick.
A coat of lip balm will be enough if the rest of your lip care routine is on-point, but sometimes you might need to do a full exfoliation routine to guarantee your lips are in tip-top shape.
Motus et bouche cousue (our lips are sealed)
Achieving plump, healthy lips isn’t difficult. It’s just a matter of adding lip care to your regular routine, especially before bed. Whether you go all out with exfoliation or just switch out your minty lip balm for a healthier alternative, we know you’ll discover smoother, happier, and more kissable lips.

Mascara is that special touch that ties every makeup look together. Without its darkening, lengthening effect on the lashes, eyes can look bare and small, so it’s key in nearly every beauty look. However, applying mascara poorly is worse than not applying it at all. Clumpy lashes and smudgy lids can ruin an entire look, and there are even some mascara mistakes that can lead to eye infections. That’s why you shouldn’t play games when it comes to mascara. We’ve collected our best mascara tips to help you avoid the most common mascara mistakes, so you can always bat your lashes with confidence. 1. Leaving too much mascara on the wand If you want to learn how to apply mascara without clumping, remember to always wipe down your mascara wand. This crucial step is often forgotten. It’s easy to miss in the excited rush to lengthen those lashes. However, a mascara wand that’s too saturated is guaranteed to cause clumping. From now on, immediately after unscrewing your mascara cap, gently wipe the wand over the lip of the tube. Pay special attention to the tip because that’s where mascara really tends to collect, and if the wand seems especially clogged up, you can wipe it down with a tissue. This way, when it’s time to apply, you won’t need to worry about big globs of mascara clumping your lashes together. 2. Pumping the wand In films, whenever a character goes to put on mascara, she’ll first pump the mascara up and down a few times in the tube. Women all over the world started believing that this was the right way to go about putting on mascara, when in reality, it’s one of the worst mascara mistakes you can make. In the short-term, it has no benefits. If anything, it just loads up your wand with a massive, clump-causing amount of mascara. In the long-term, it introduces air and bacteria into the precious tube, which significantly shortens the life of your mascara. 3. Using old mascara Of all the most common makeup products, mascara has the shortest shelf-life. If you use your mascara after its use-by date, you can run into all kinds of issues. It will get dry, which leads to clumpy lashes, and it may also start harboring bacteria, which can cause styes and painful infections. Most mascara should be replaced 3-6 months after opening. If you’re worried about forgetting, we’ve set up an auto-subscription system that will send you a new tube of our best-selling Cabaret Premiere mascara every few months. 4. Forgetting to wiggle Always remember to give your mascara a wiggle! This classic mascara tip guarantees that your lashes will look both voluminous and separated every time. When you apply your mascara, give it a small wiggle as it comes in contact with the base of your lashes. This will allow the bristles of the wand to really wedge themselves in between your lashes, coating them thoroughly without clumping them together. Then, as you pull the wand up to coat the length of the lashes, move it in a slight zig-zag motion to keep that momentum going. 5. Only coating one side This mascara hack is especially for the blondes and redheads out there, because brunettes can sometimes get away with making this little mistake. When you apply your mascara, you only see the underside of your lashes, so you might forget the top. If you leave the top bare, the second you blink, the natural color of your lashes will be visible, and it’ll take away from the consistency of your makeup. To cover the top part of the lashes, use the tip of your mascara wand and carefully color it in, especially close to the lashline. Don’t try to build up volume or length from above since it can weigh the lashes down; just focus on coloring things in. 6. Blinking too quickly It can be tempting to blink immediately after putting your mascara on, but unfortunately, it often results in black smudges on the eyelid ruining your eyeshadow. Not blinking may sound like a tall order, but if you just close your eyes after applying mascara, the issue will be solved. Just wait a few seconds so that when you finally open your eyes, the mascara will be dry and won’t smudge. 7. Applying too many coats It can be tempting to add coat after coat of mascara, but it rarely works well in reality. Yes, 5-6 coats of mascara will make your lashes look longer and thicker. However, it’s also going to make them look uniformly thick from root to tip, leading to a “spidery” look. To avoid having your mascara look spidery, you need to exercise restraint. Don’t apply more than three coats to your lashes, and if that doesn’t give you the effect you want, you may just need to switch to a more volumizing mascara. 8. Forgetting to remove it at night Sleeping with mascara on is never a good idea. In the best-case scenario, forgetting to remove it at night will just dry out your lashes, cause a few to fall out, and leave a few marks on your pillow. But it can also lead to eye irritation and even eye infections. This is another serious mascara mistake, so make sure to remove your eye makeup thoroughly every night with a high-quality makeup remover. 9. Using the same mascara for all occasions Wearing the same mascara all the time isn’t the biggest mascara mistake you could make, but it can get boring. Tailor your mascara choice to each event! A lengthening and separating mascara is best for day-to-day. Waterproof mascara is a must-have for beach-side vacations or rainy days. For date nights and parties, emphasize your eyes with a volumizing mascara. For upscale evening events, when you want maximum drama, double up! Start with a coat of waterproof mascara for a separated, waterproof base, and then add a coat of volumizing mascara for a false-lash effect. Now that you know all of our favorite mascara tips, no more faux pas!

These days, more of us around the world are using technology to speak with friends, loved ones, and colleagues than ever. Life and communication look different, and so do we. While we’re used to styling ourselves to look gorgeous in person, this doesn’t always transfer through a digital screen. Looking nice on camera is a different skill set, and it’s no longer limited to Hollywood glamour or French fashion shows. That’s why we’ve compiled this list of tips and tricks that will help you learn how to look great on zoom calls. Whether you’re curling up on your sofa for a remote trivia night with friends or armed with coffee for an early-morning work meeting, these video call makeup tips will help you look great and feel confident. Choose the Right Filming Location As the best videographers would tell you, lighting is everything. Sit in front of a window and allow the sun’s rays to light up your features. The best lighting for Zoom calls illuminates your face from the front, not from overhead or behind. Artificial lighting can appear yellow on a screen, which can mess with the way you appear through the lens. If you’re taking a call at night or otherwise don’t have access to natural lighting, try placing a white-toned light in front of you to get a similar effect. Turn off any rear or overhead lights, then check to see if the lighting looks natural on-screen and that you can easily be seen without strange shadows or highlights. You might have to adjust other lights in the room by turning them on and off until you get the desired effect. Once you’ve chosen the right location, simplify your background so that fellow video call attendees can focus on your face, not the overcrowded shelving or dirty laundry behind you. Adjust Your Camera Angle Next, adjust your camera angle so that you can look better on video. You should be able to look comfortably forward into your camera, not up or down. A camera from below, where most laptops, tabletops, and even our phones are naturally positioned, can distort your features and cause your face to look unnatural. The people you’re speaking with may end up with a view of your nostrils rather than being able to make eye contact. Being able to look straight into the camera will also help with your posture so that you don’t have a sore neck or back halfway through your call. Use regular household items such as books stacked under your device to get a flattering angle. Keep it steady so that it doesn’t topple over, especially if you have children or pets in the home that may bump the table or stand you’re using. Have Confidence The French know that the first step to success is to have confidence. When you feel your best, your natural beauty shimmers through. Dress from head to toe, even if nobody can see your lower half. Or, have some fun and pair pajama bottoms with your best blouse. The relaxation and happiness you feel when you’re comfortable in your own skin are contagious, so focus on feeling good, and the rest will follow. Conceal Discoloration Concealing discoloration, such as eye bags and red spots, goes a long way on camera, which can accentuate our imperfections. Dab on some concealer to hide any blemishes. If needed, you can also use a camera filter to even out your skin tone. Choose Vibrant Colors You can cause makeup to look better on video calls by selecting brighter, bolder colors than you would when meeting up in person. A vibrant blush and lipstick combo will make you look more lively and less flushed out, as can sometimes happen in a video call. Our Matte Constance Duo Pack comes with two stunning lipstick shades for you to try. Focus on Your Eyes Focus on your eyes while formulating your makeup look to draw attention to them on camera. Cover dark circles and apply Cabaret Premiere mascara for beautiful, full lashes. Pair this with a neutral eye shadow to complement your vibrant lipstick and blush selection, and voila! Keep it Simple Don’t feel that you have to go overboard on applying your makeup to look cute on your Zoom call. A little can go a long way, and it’s alright to keep it simple. Focus on accentuating one or two features, and don’t be afraid to have some fun trying new techniques or products. Relax, be yourself, and don’t take things too seriously. Preview Before Going Live Whether you’re using Zoom, Facetime, Skype, or even just taking a photo, you’ll likely notice that your face looks much different than it does in the mirror. The lens type, the distance between you and the camera, and the angle can all distort your image. This is why it’s important to preview before you go live so that you have an idea of what others will see. Fix any lighting, makeup, or angle issues ahead of time so that when you take the call, everything goes smoothly and you aren’t stressed about the lipstick on your teeth or that plate you forgot to put away in the background. Enjoy Your Meeting You're all set to join any video call with confidence! When it comes time to log on, relax because you've thoroughly prepared for this. You go girl!

When it comes to a simple makeup look that will work for your busy everyday life, no one does it quite like the French. The French look is all about classic beauty, which appears to be effortless and chic all at the same time. A staple of the French look is minimalist makeup. For the French woman, less truly is more — they choose to enhance their natural features and embrace their imperfections rather than painting on a new face with excessive contouring. Following the French philosophy and embracing a minimalist makeup routine leaves you with more time to enjoy life. Read on for seven tips on how to find an everyday makeup routine that you can stick to. 1. Declutter It’s safe to say that most women have more makeup than they need or even use. A cluttered vanity and makeup bag quietly eat your time as they cause you to search for the item you need or pause and think about what shade to use that day. Unless makeup is your profession, there is no need for a makeup arsenal fully stocked with every shade. Decluttering your makeup bag will make your chic yet simple makeup look easier to achieve on a daily basis and will save you time each day. If you find that you don’t need a full coverage foundation, switching to a tinted moisturizer or BB cream can simplify your makeup routine because it does double duty by acting as a moisturizer and providing light coverage. Paring down your makeup arsenal can make applying your makeup less daunting, and you will find yourself becoming a master at using the cosmetics you keep. So, where to start when you first decide to declutter? Following a few simple guidelines will get you set in the right direction. The first step to decluttering is an essential one: carefully check each product’s expiration date and dispose of anything that is past its expiration. You should also throw out anything where the texture, consistency, or smell is off — old makeup is a notorious breeding ground for bacteria that can damage your skin and cause breakouts. Organizing Once you have disposed of your expired makeup, you can categorize everything and tackle each category separately. Pick out the items you regularly use as well as the items that you love so much you can’t bear to get rid of — these items can go back into your makeup bag or drawer. Any remaining makeup can be given away or tossed. 2. Prep your skin To achieve the effortless French look, you must prep your skin! Prepping your skin will provide you with a clean palette and smooth complexion, which is a must for a natural look. A smooth complexion will allow you to use fewer cosmetics, eliminating the risk of a caked look. Cleansing and moisturizing are the two most essential steps to any skincare routine. By taking the time to care for your skin with intentional, natural treatments, you’ll achieve a complexion and glow that may not need any help from foundation at all! Daily cleansing helps rid your face of dirt, oils, and other impurities and sets your skin up for success. Regular facial moisturizing gives your skin that extra boost it needs and can help bring a dewy and more youthful look. 3. Use lighting to your advantage When applying your makeup, it is best to use natural light. We’ve all been there — you find yourself in a poorly lit room or a bathroom with yellowish light, and you really take your time getting ready, only to find when you step outside that you have unblended patches, causing you to feel like a clown. The best way to avoid this cringe-worthy scenario is to apply your makeup in natural lighting. Both yellow and fluorescent lighting tend to make you look pale, which often results in the application of too much bronzer or blush. Lights with blue, green, or pink hues are also common culprits in makeup mishaps. Natural light alternatives While a large, naturally lit bathroom or vanity table is ideal, that is not always possible. A good alternative to true natural light is “natural” white light bulbs placed on each side of your mirror to ensure that your face is evenly lit. The placement of lighting is nearly as important as the color of the bulbs. When investing in vanity lights, it is important to place lights on each side of the mirror and not just above. Lighting only above the mirror may save space but will cast shadows on your face and make it more difficult to apply your makeup evenly. For best results, lights should be installed at a full 270° around your mirror – this will not only yield better results with your makeup, but you will also feel more glamorous, giving you a confidence boost that will follow you out the door! 4. Use the correct tools for the job It’s always so tempting to take shortcuts in life that may not provide the best outcome. This is especially true when it comes to makeup. Using the wrong tools to apply your makeup is like trying to file your taxes on your phone; it may get the job done but will leave you frustrated and with lackluster results. For example, if you rely solely on your fingers to apply and blend your cosmetics, you will end up with uneven patches rather than achieving a finished and put-together look. While it is true that you can go overboard on makeup brushes, they do have their place in your collection, and if you have not invested in a set of brushes, it may be time to do so. If you already have a brush set, make sure to take the time and get acquainted with it – learn each brush’s purpose and how to use it properly. If you use the wrong brush for the job, it won’t give you the result you are looking for. 5. Choose one star of the show For an easy natural makeup look, choose one feature to emphasize with your makeup. The best way to highlight one element is to stick with your favorite facial feature. The most obvious choices are your eyes or lips. Highlight your eyes To emphasize your eyes, do not go over the top with colored shadows and liners — stick to a nude or neutral shadow with a slight shimmer, and go with some simple eyeliner that can be smudged for a night-out look. Most women tend to pass by the brown eyeliner in favor of black, but brown eyeliner is an excellent choice for a simple makeup look as it looks great on most skin tones and blends better with your lash line, giving the illusion of longer lashes. Your lashes are equally important if you want your eyes to pop. Just a light coat of quality mascara, and you’re ready to go! When choosing mascara, don’t be afraid to go with brown over the traditional black. Brown mascara will provide a more natural look as it blends better with your lashes. Highlight your lips Lips are most easily emphasized by the use of a bold lip color, but it requires a little more than a quick swipe of your favorite shade. To make your lips stand out, you should always start with a sharp line drawn with a lip pencil — just inside your natural lip line for a daytime look and just outside your lip line for an evening look. Once you have your lips defined, you can apply and blend your favorite shade of lipstick, lip gloss, or even tinted lip balm! For some extra definition around your lips, you can use a little concealer or foundation powder to make your lip color appear bolder. If you covet the confident red-lipped look of the French, don’t be afraid to try it out for yourself! There is no need to feel self-conscious about the color of your teeth; if you choose a red lipstick with a blue undertone, it can help cancel out any yellowness on your teeth. Whichever feature you choose to make the star of your face, it’s important that everything else be minimal. When choosing a blush color, pick one that most closely matches your face's natural flush after exercise. If you choose to emphasize your eyes, go with a more natural look for your lips by using a nude lipstick or a color that is two shades darker than your natural lips. You should also avoid any temptation to overdo your eyebrows — leave them naturally full as it will give your eyes a more open look without any added makeup. 6. Don’t overdo it If you are aiming for a simple and natural makeup look, the biggest mistake you can make is being too heavy-handed. Too much foundation, blush, or even lipstick and eyeliner can make you look far from natural. Applying too much foundation can also suck the moisture out of your face, leaving you with a cakey appearance, or worse yet, the appearance of crepe paper skin! If you find yourself in a situation when you have applied too much foundation, first try blending again, and if that does not correct it, try wetting a beauty sponge and dabbing it on your face to remove some of the excess. If you feel comfortable in your own skin, don’t be afraid to skip the foundation altogether or go with a BB cream or tinted moisturizer instead. You can also choose to use foundation in trouble areas only — be sure to thoroughly blend the edges if you go this route. When you sit down to do your makeup for the day, the most important thing to remember is that your makeup should not be used as a mask to cover yourself up. It should be about highlighting your individuality and uniqueness — an expression of yourself. A natural makeup look is timeless. Stick to neutral colors; with simple eyeliner and a neutral color palette, you cannot go wrong! However you choose to apply your makeup, take a step back, and look at yourself. You are beautiful as you are. Be confident! Believe in your own magic and beauty, and the rest of the world will too.