


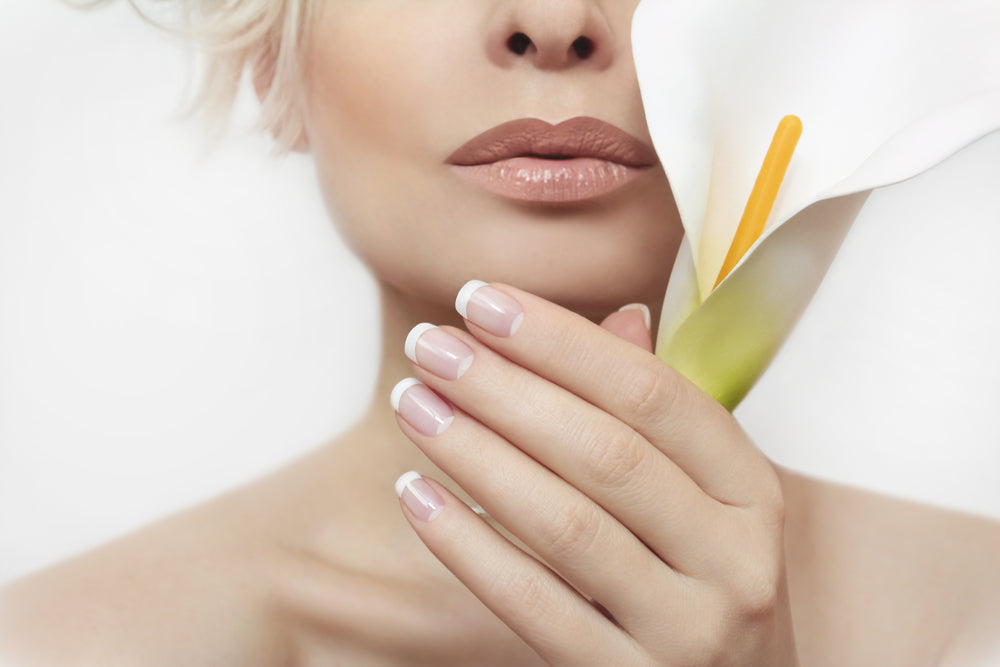
11 Steps to the Perfect At-Home French Manicure
One of the most important parts of French beauty is looking well put-together. On the one hand, you want to look effortless, but on the other hand, you also want to look intentional.
Groomed nails are essential for striking this balance, especially if you opt for a natural-looking French manicure.
We’ve compiled a step-by-step guide to achieving perfect nails at home, so you can skip the nail salon. You can also adapt these tips to give yourself a relaxing pedicure! First, we’ll cover all the tools you need to have on-hand, and then dive straight into the how-to.
At-home manicure tools
 You don’t need fancy tools to create a DIY French manicure at home, but you do need some basic nail grooming essentials. Here’s our comprehensive list of all the things you’ll need!
- Nail polish remover
- Emery or crystal nail file
- Cotton pads and cotton swabs
- Cuticle pusher (optional)
- Warm water and soap
- Hand cream or cuticle oil
- Hand scrub (optional)
- Clear base coat
- Clear topcoat
- Nude, pink, or colorful nail polish
- White nail polish
- Thin synthetic brush (optional)
1. Remove old polish
First, if you still have some remnants of old nail polish on your nails, make sure to scrub it away thoroughly with cotton pads and nail polish remover. Some colors tend to really get lodged along the edges of the nail, in which case, use a cotton swab dipped in remover to really get in there and clean things up.
2. Shape your nails

Next, file the tips of your nails to an even shape. There are all kinds of nail shapes you can choose from, but we prefer keeping it natural with an almond, oval, or rounded nail shape.
When you file your nails, only go in one direction at a time, rather than filing back and forth. Go slowly, so you can control the shape you create and don’t accidentally over-do it.
3. At-home manicure soak
 If you plan to trim or push back your cuticles, it’s crucial that you soften them first with an at-home manicure soak.
Fill up a shallow bowl of warm soapy water, and then dip your finger in, just up to the cuticle. Leave your fingers in the water for just 2-3 minutes, and take the moment to relax.
This will be long enough to soften the cuticles but not so long that it’ll saturate your nails with water, which can compromise the integrity of your nail polish later on. If you’re happy with the condition of your cuticles, you can skip this step altogether!
4. Push back the cuticles (gently!)
Pull your nails out of the water, and dry them with a soft towel. Then, use the cuticle pusher tool to gently press against your cuticles and push them back a little. If pushing on your cuticles is painful at all, it’s a sign you’re overdoing it, so make sure to ease up on the pressure.
In general, we don’t recommend trimming the cuticles at home unless you already have a bit of professional experience. It’s easy to damage cuticles when trimming them, which may lead to infections or cause the skin to grow back thicker.
5. Exfoliate and moisturize
 Next, it’s time to give your hands and cuticles a nice treatment! For maximum pampering, exfoliate your hands by rubbing them with a scrub. You can even make your own!
If your scrub is moisturizing enough, you can then just rinse your hands and move on to the next step. If you skipped scrubbing, then take a moment to rub your hands and nails with hand cream, or apply a designated cuticle oil to the nails. Wait a few minutes to allow your nails to absorb as much of the oil as possible.
For simple groomed nails, you can stop here! Moisturized, well-shaped nails are already enough for simple French beauty. However, to take your nails to the next level, you’ll want to add some polish.
6. Remove excess moisture
Next, dip a cotton swab in nail polish remover, and carefully wipe it only over your nail, being careful to avoid the cuticles. This will remove any excess moisture or oil from the nails to guarantee that the polish adheres well. Let the remover evaporate entirely before moving to the next step.
7. Lay down your base coat
A base coat of polish is essential for protecting your nails from yellowing and creating an even base for the polish. Apply the base coat carefully to each nail, making sure to only use a minimal amount so that it dries quickly.
8. Apply your color
 Once your base coat has thoroughly dried, you can apply your colorful nail polish! Pink, peach, and nude are the classic choices for a French manicure, but other colors are perfectly acceptable as well.
Apply the polish in thin layers, starting about a millimeter away from the cuticle, and painting it on in strips. Once your first coat fully dries, apply the second coat, and wait for it to dry, as well.
9. DIY nail tips
 Turn your classic mani into an ultra-chic French manicure. Dip an old eyeliner brush or a dedicated nail brush into some white nail polish. Then, carefully paint the tips (i.e., top 2-3 millimeters) of your nails. If your hand is a little shaky, you can lay down some sticky tape over the bottom of the nail first to guarantee a clean line.
10. Finish with a top-coat
Once your polish is totally dry, finish things off with an ultra-thin layer of topcoat. This will help seal in all of your hard work, add some sheen, and prevent your nail polish from chipping.
11. Clean up the edges
Once your topcoat is fully dry, it’s time to fix mistakes! Even the pros sometimes smudge a bit of polish over the cuticle, but thankfully, it’s easy to clean up. Just soak a cotton swab in some nail polish remover and use it to erase any smudges.
Nailed it!

It takes a bit of time and maybe even practice, but achieving the perfect manicure at home is totally doable. Don’t be afraid to skip the nail salon next time you want to treat yourself to a French manicure!
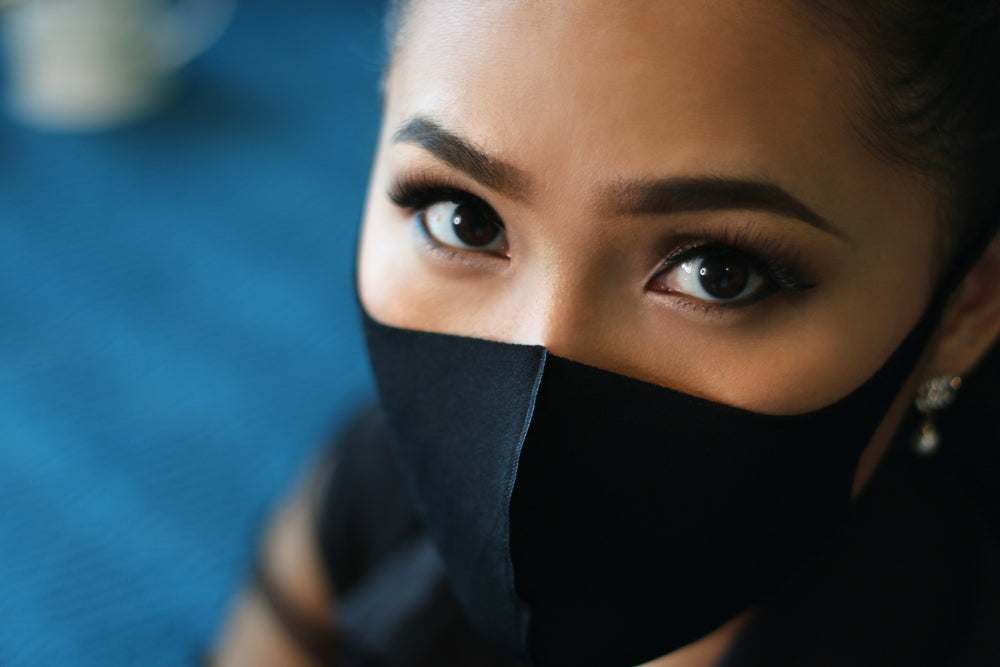
It looks as though face masks won’t be disappearing anytime soon thanks to Covid, which means applying lipstick falls a bit on our daily makeup list. When you’re wearing a mask, your eyes naturally take center stage. And since half of your face is covered, it’s important to make the most of what’s on show. Fashionable masks are great, but they don’t quite measure up to the magic of makeup. Whether you’re working from home, heading to the office, or taking care of those everyday tasks, you still want to look and feel your best. What better way to reclaim your beauty ritual than to have fun with your eye makeup when wearing a mask? Forget about putting makeup on under your mask — what you need is a killer look for your eyes. Here are our favorite eye makeup looks when wearing a mask. Voluminous lashes Take a minimalist approach to your eye makeup with voluminous lashes. Full, fluttery, and fabulous is the name of the game here. And the great news? You don’t need lash extensions or falsies to amp up the volume. Check out our instant volume mascara — definition and volume in just one coat! Add a few extra for even more drama, depending on the look you’re going for. Mask & match There’s a fun new mask makeup look trending right now that is all about matching your makeup to your mask. Pick a colorful, patterned mask of your choice, then experiment with creating an eye makeup look around it. For example, if you’re wearing a rainbow-colored mask, why not go for a rainbow-inspired eyeshadow theme? There are no rules here, apart from breaking them! A neutral smokey eye An all-out smokey eye might be a little too much for a daytime look. The next best thing? A neutral smokey eye! Use a natural eyeshadow 2-3 shades lighter than your skin tone that has a bit of a shimmer to it. Apply the eyeshadow to the inner corners of your eyes to brighten your eyes and contrast with your mask. This should work with most masks as they tend to be muted in color. Finish your look with some mascara for extra pop, and you’re good to go. Rose gold eyeliner Who says shimmer and sparkle are just for celebrations? Rose gold eyeliner is so on-trend right now and will add a dash of glamour and glitter to any look. There are plenty of options to choose from right now. Apply it as liberally as you like, and add some flicks to the outer edges of your eye for extra pizzazz. This mask makeup look is definitely one of our favorites! A pop of pastel If you’re a fan of playing with color and looking for something to brighten up your face, try a wash of color on your lids. All colors work with this look, but pastels are oh-so-pretty — especially during spring/summer. Keep the rest of your makeup minimal, and allow your eyes to steal the show. If you’re not sure what color to go for, blue is a safe bet for all skin tones. Use one solid color, a shimmery shadow, or add some depth at the crease line with a darker shade. Cat eye When you’re wearing a mask, people’s eyes will be drawn to the center of your face. A sassy cat eye is the perfect detail to draw that attention outward and create a sexy, striking look. Have fun with your cat eye and experiment with colors and patterns. Keep it as subtle or dramatic as you like. Periwinkle flicks Without a doubt, eye makeup when wearing a mask is a must to prevent your face from totally disappearing! But if you’re not used to braving bold eye makeup looks, a dash of colored eyeliner is a great way to ease yourself in. Don’t worry, lipstick will be back in play soon enough! But until then, why not experiment with color around your eyes? Match your eyeliner to your mask, or clash on purpose. This mask makeup look is guaranteed to play up your eyes in a big way. Metallic magic If you want to take the rose gold eyeliner look to the next level, how about an all-out metallic eye? This makeup look is super feminine, sexy, and flattering. It’ll give your eyes that extra boost and help them pop against your mask while highlighting their natural, gorgeous shape. Just sweep it lightly across your upper lids. Add some classic French mascara for volume, and voila! Winged eyeliner Sometimes all you need is your favorite eyeliner to create a killer eye makeup statement. The winged eyeliner look is classic and flirty. It will flatter the natural shape of your eyes without any need for eyeshadow. Magic, right? You’ll be ready to leave the house in five minutes! Perfect for those days when you’re short on time, or you snooze your alarm. If you have a shaky hand, try using a template or using a dot-to-dot method to keep your eyeliner symmetrical. Sunset shadow There’s another popular eye makeup mask trend all over social media right now known as “sunset” shadow. This is all you need to jazz up a plain old mask and bring some color and adventure into your life! Pick a handful of different sunset colors, like oranges, pinks, purples, blues, yellows, golds, etc. Start with one color as a base on the lids, then layer on top to create that stunning sunset vibe. Play around with different colors and arrangements. This look will be slightly different every time, and that’s the beauty of it. And that’s how to wear makeup with a face mask! Just because you have to wear a mask, it doesn’t mean your makeup game has to take a hit. Give these eye makeup looks a try and watch as they transform your face.
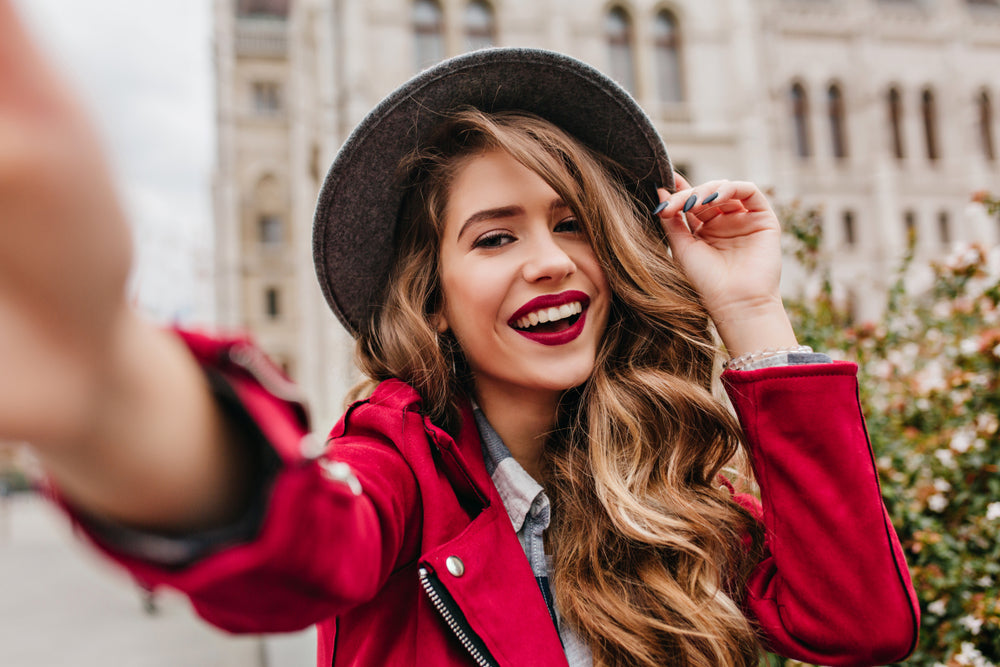
French women are known for their effortless yet sophisticated look. French girl style is all about looking like you basically "woke up like this," perhaps with just a touch more polish. It’s never too much or too little — it’s always perfect. The same philosophy applies to French hairstyles. They should never be too complex or intricate. Instead, the focus should be on having a flattering haircut styled to honor your natural hair texture and to frame your beautiful features. If you’d like to give French girl hair a try, we’ve got some ideas to inspire you. We’ve selected our four favorite ladies’ hairstyles for 2021, and we’ll explain how you can achieve them, along with some matching makeup tips. French bob cut A bob cut is one of the most popular French haircuts right now! Vogue called it the biggest hair trend of 2020, and we can assure you that it’s going strong well into 2021. While every bob is tres chic, consider adding bangs to your look to truly embody that French girl style. To get the bob cut The secret to getting a bob to work for you is to make sure that it hits your features just right. The eye will be drawn to the spot where the bob ends or where the fringe falls, so consider which features you’d like to emphasize with the length and layering. You can try to cut your hair on your own, but we’d recommend going to a professional hairdresser. A great hairdresser will take the time to chat with you and help you figure out which lengths will flatter your face shape the best. Matching your makeup to a French bob If it’s your first time going short, you may want to put a little extra effort into making sure your makeup is visible. We’re partial to pairing this popular French haircut with a vibrant red lip, using our Matte Constance Lipstick in Classic Red. Wavy French girl hairstyle You don’t have to go short to achieve amazing French girl hair. Soft waves and natural-looking texture are just as chic, and they work beautifully on longer bobs, shoulder-length hair, and even ultra-long tresses. While a natural wave looks totally effortless, it does take a little bit of technique. To get soft waves If you’re naturally blessed with wavy or curly hair, the curly girl method is ideal because it skips the damage of heat styling and brings the very best shape out of your tresses. If your hair is naturally straight, you’ll have to resort to just a bit of heat styling. First, spray your hair with a texturizing salt spray, and blow dry it if needed. Then, use a large-sized curling iron to create alternating curls in your hair, focusing only on the bottom half of each strand. Finally, once your entire head is curly, use your fingers to gently loosen up the curls to turn them into gorgeous waves. Tie it together with makeup The beautiful thing about softly textured waves is that they match any makeup look, including barely-there makeup. The key is to keep the eyes nicely framed by your brows, so they don’t disappear behind the mane of hair. All you need to do is lightly fill them in with the Brow Arcade pencil and then brush them up into a groomed look. Effortless messy bun While it’s important to have a signature look, French girl style is also about knowing when to change things up. Before dates or nights out, having a go-to effortless, yet sophisticated, bun really comes in handy. Creating a simple bun The more effortless and messy you want your bun to look, the more bobby pins you’ll need, so make sure to have plenty on hand. You’ll also need strong, tight hair elastics. Start with your hair already a little wavy, and consider using a little dry shampoo to add some grit. First, pull your hair into a ponytail, leaving a few loose strands at the front to frame your face Next, twist your ponytail, and then wrap it around the elastic so it forms a donut-shaped bun. Use bobby pins to secure the base of the bun. Then, gently pull on the bun with both hands to slightly expand it and give it a more voluminous look. If any strands come loose, you can tuck them under the bun and then pin them into place. It’s super easy to create, but the results are impressive. Match it with soft-glam makeup You’ve already gone through the effort of pulling and pinning your hair up into a bun, so finish off your look with a careful swipe of liquid liner to make your eyes gleam, and then a healthy dose of our Provocation volumizing mascara. Flirty ponytail French girl hairstyles can lean into a playful, feminine vibe as long as they retain their chic simplicity. A hairstyle with a low-ponytail does the trick, and it’s great for days when you want your hair out of your face. Tying it off with a scarf gives rustic charm and a bit of color to the look! Styling the perfect ponytail You can rock a sleek ponytail if you like, but we’re partial to this voluminous style. You can start with air-dried hair or go all out and use a hair curler to achieve loose waves. If your hair is feeling a little flat, section it at the crown, and tease a little bit to add some volume. Then, pull your hair back into a low, loose ponytail. Leave a few loose strands around your face, and give them a quick curl with a curling iron. Finally, pick a colorful scarf, and tie it around the base of the ponytail! Playful makeup to match This kind of look pairs best with a fresh face. We suggest giving your pout a sheen; so first, use our volumizing Polynesie Francaise gloss in Bora Bora, and then add a sheer wash of pink blush over the cheeks. Finishing in style Which of these French hairstyles will you try in 2021? From changing things up with a short bob to embracing length and texture, French girl haircuts and styles give easy options that’ll keep you feeling chic and sexy!
One of the best things about makeup is how creative and evolving it can be. While clothing trends force you to buy new products every season, trendy makeup often just requires a change in technique. Experimenting, changing, and playing around with hot new trends from Instagram, TikTok, or the runways can be a ton of fun! However, these makeup trends are usually fleeting. Unlike classic makeup looks, they won’t stick around for longer than a year or two! It’s fun to look back at photos from the ‘80s or ‘90s and admire how differently women used to do their makeup, but it’s a little scary to imagine others doing the same with photos of you. When you get ready for graduation photos, weddings, and other big events, do your makeup in such a way so that when you look back at the photos, you won’t find yourself thinking, “gosh, I can’t believe we all used to wear our makeup like that!” In this article, we’ll go through each hot makeup trend whose days are unfortunately numbered, and reflect on the more timeless makeup looks equivalent to the trend. While trends are fun for a night out or a creative Instagram story, classic makeup looks are the ideal choice for the most important occasions, so they’re utterly essential to master! Hot trend: soap brows Brushed up brows are the go-to look for a ton of influencers these days, who usually achieve them with soap, brow gel, or even a semi-permanent lamination. They make the eyebrows look bushy, fluffy, and more symmetrical, and they’re very reminiscent of the styling for model brows in the ‘80s. Soap brows give a youthful look and they’re a lot of fun, but like other brow trends before them, we think a new look will replace them shortly. Classic look: groomed brows Soap brows are great fun—we think they’re going to be a major marker of the end of the 2010s. However, keeping your brows classically groomed has the benefit of looking good today as well as in the future. Eyebrow pencils tipped with a grooming wand, like the Brow Arcade, are incredibly helpful for this technique since you can fill in your brows and then brush the hairs so they go to the side instead of upwards, to lay down in a more natural way. Hot trend: fox eyes The fox eye makeup trend has absolutely taken over social media and the red carpet, especially by the likes of US-based celebs Bella Fox and Kendall Jenner. It’s a gorgeous look that gives the face an angular, elven appearance through pointed eyeliner and brows that are shaved off at the arch and filled in on an upward angle. Classic look: classic eyeliner View this post on Instagram A post shared by Vivienne Sabó Paris (@viviennesabo.paris) Fox eyes may be sultry and sexy, but we predict that in the long term, eyeliner that makes the eyes look a little larger will continue to endure. After all, we’ve been doing our eyeliner this way since the ‘40s, and looking back on photos from that era, it still looks stunning. The trick to keeping your natural eye makeup looking classy is to keep the liner away from the inner corner of the eye, and then to create the wing by following the natural angle of your lower lash line. We have a few more tips and tricks for this look here! Hot trend: baking or strobed skin We live in an era of extremes, with two ultra-popular foundation trends that directly contradict each other. You either bake your makeup under a thick layer of powder for 5-10 minutes, to guarantee an impenetrable finish, or you pack on the glowy serums and highlighters for a strobed, reflective skin finish. It can be great fun to experiment with both of these trends! Classic look: natural skin View this post on Instagram A post shared by Vivienne Sabó Paris (@viviennesabo.paris) In the long term, however, we think natural-looking skin with a satin finish will always be the classiest choice. It’s exactly in the middle between very dewy and matte skin, with the same level of reflectiveness that the skin has when it’s happy and moisturized. To achieve such an easy natural makeup look, all you need is a light coverage foundation and maybe a touch of concealer. Then, a light dusting of powder with a fluffy brush will help to lock things into place and control excess sheen without making your skin look flat and dry. Oh, and there’s one more way to achieve this look that’s even easier. Skip the foundation altogether, for the natural, no-makeup look! Hot trend: flattened Cupid’s bow We first noticed ultra-pouty lips with a flattened Cupid’s bow on the gorgeous Ariana Grande. Then, before you knew it, everyone was applying their lip liner with a continuous, rounded line. It essentially changes the lips’ natural shape, transforming them into elongated ovals. While we love the look right now, it might seem odd in just a few short years. Classic look: slightly overdrawn lips While you don’t need to go overboard with it, overdrawing the lip line is actually a very timeless makeup look that goes at least as far back as the ‘30s. The key to achieving lush and full lips without looking cartoonish is to follow the vermillion border, which is the skin-colored line of demarcation surrounding the lips. The best part? You can create both the classic and trendy lips with our Le Grand Volume lip pencils. Time and place for every makeup look Every style and technique, from the easiest natural makeup look to the most outrageous hot trend, has its time and place. We don’t want you to forsake makeup trends, because they add spice to life, but it’s just as important to master the classic makeup look so you can look chic for the coming decades.