


Hot Makeup Trends vs Timeless Beauty
One of the best things about makeup is how creative and evolving it can be. While clothing trends force you to buy new products every season, trendy makeup often just requires a change in technique. Experimenting, changing, and playing around with hot new trends from Instagram, TikTok, or the runways can be a ton of fun!
However, these makeup trends are usually fleeting. Unlike classic makeup looks, they won’t stick around for longer than a year or two! It’s fun to look back at photos from the ‘80s or ‘90s and admire how differently women used to do their makeup, but it’s a little scary to imagine others doing the same with photos of you.
When you get ready for graduation photos, weddings, and other big events, do your makeup in such a way so that when you look back at the photos, you won’t find yourself thinking, “gosh, I can’t believe we all used to wear our makeup like that!”
In this article, we’ll go through each hot makeup trend whose days are unfortunately numbered, and reflect on the more timeless makeup looks equivalent to the trend.
While trends are fun for a night out or a creative Instagram story, classic makeup looks are the ideal choice for the most important occasions, so they’re utterly essential to master!
Hot trend: soap brows
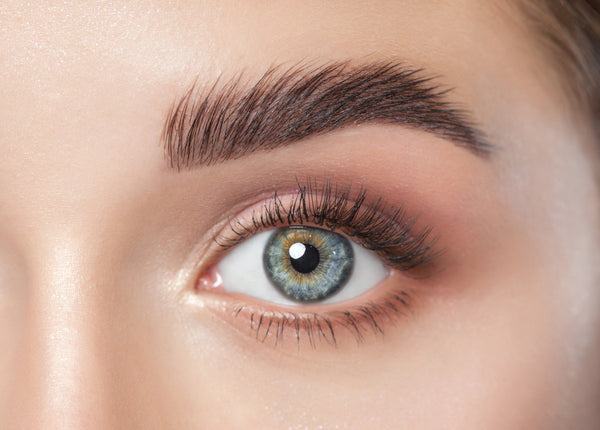 Brushed up brows are the go-to look for a ton of influencers these days, who usually achieve them with soap, brow gel, or even a semi-permanent lamination. They make the eyebrows look bushy, fluffy, and more symmetrical, and they’re very reminiscent of the styling for model brows in the ‘80s.
Soap brows give a youthful look and they’re a lot of fun, but like other brow trends before them, we think a new look will replace them shortly.
Classic look: groomed brows

Soap brows are great fun—we think they’re going to be a major marker of the end of the 2010s. However, keeping your brows classically groomed has the benefit of looking good today as well as in the future.
Eyebrow pencils tipped with a grooming wand, like the Brow Arcade, are incredibly helpful for this technique since you can fill in your brows and then brush the hairs so they go to the side instead of upwards, to lay down in a more natural way.
Hot trend: fox eyes

The fox eye makeup trend has absolutely taken over social media and the red carpet, especially by the likes of US-based celebs Bella Fox and Kendall Jenner. It’s a gorgeous look that gives the face an angular, elven appearance through pointed eyeliner and brows that are shaved off at the arch and filled in on an upward angle.
Classic look: classic eyeliner
Fox eyes may be sultry and sexy, but we predict that in the long term, eyeliner that makes the eyes look a little larger will continue to endure. After all, we’ve been doing our eyeliner this way since the ‘40s, and looking back on photos from that era, it still looks stunning.
The trick to keeping your natural eye makeup looking classy is to keep the liner away from the inner corner of the eye, and then to create the wing by following the natural angle of your lower lash line. We have a few more tips and tricks for this look here!
Hot trend: baking or strobed skin
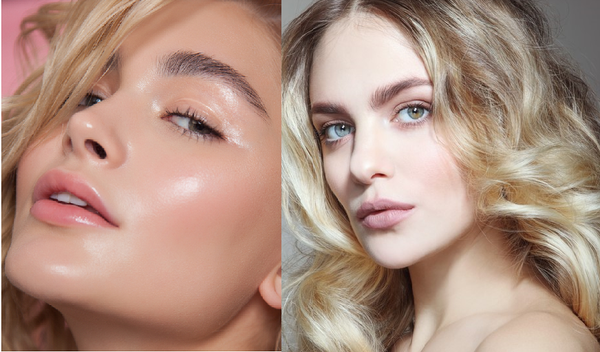
We live in an era of extremes, with two ultra-popular foundation trends that directly contradict each other. You either bake your makeup under a thick layer of powder for 5-10 minutes, to guarantee an impenetrable finish, or you pack on the glowy serums and highlighters for a strobed, reflective skin finish. It can be great fun to experiment with both of these trends!
Classic look: natural skin
In the long term, however, we think natural-looking skin with a satin finish will always be the classiest choice. It’s exactly in the middle between very dewy and matte skin, with the same level of reflectiveness that the skin has when it’s happy and moisturized.
To achieve such an easy natural makeup look, all you need is a light coverage foundation and maybe a touch of concealer. Then, a light dusting of powder with a fluffy brush will help to lock things into place and control excess sheen without making your skin look flat and dry.
Oh, and there’s one more way to achieve this look that’s even easier. Skip the foundation altogether, for the natural, no-makeup look!
Hot trend: flattened Cupid’s bow

We first noticed ultra-pouty lips with a flattened Cupid’s bow on the gorgeous Ariana Grande. Then, before you knew it, everyone was applying their lip liner with a continuous, rounded line. It essentially changes the lips’ natural shape, transforming them into elongated ovals. While we love the look right now, it might seem odd in just a few short years.
Classic look: slightly overdrawn lips

While you don’t need to go overboard with it, overdrawing the lip line is actually a very timeless makeup look that goes at least as far back as the ‘30s. The key to achieving lush and full lips without looking cartoonish is to follow the vermillion border, which is the skin-colored line of demarcation surrounding the lips.
The best part? You can create both the classic and trendy lips with our Le Grand Volume lip pencils.
Time and place for every makeup look
Every style and technique, from the easiest natural makeup look to the most outrageous hot trend, has its time and place. We don’t want you to forsake makeup trends, because they add spice to life, but it’s just as important to master the classic makeup look so you can look chic for the coming decades.

Is a makeup sponge part of your beauty toolkit? For us, it’s a must-have! Makeup blenders, in particular, are a fairly recent innovation that has had a big impact. French girls have totally fallen in love with makeup blender sponges because, when used damp, they give a glowy finish that’s integral for achieving natural-looking makeup in seconds. Whether you only apply a touch of concealer once in a while or you like a full foundation and contour makeup look, using a makeup sponge correctly will help up your makeup game. In this post, we’ll focus on a more French approach to using a makeup blender, with tips for simplistic makeup that’ll help your skin look naturally radiant. First, we’ll give you a quick overview of the different types of makeup sponges, and then we’ll provide tips for using them depending on the products you like. Types of makeup sponges There are two major types of makeup sponges to choose from, so let’s quickly summarize the details you should know about them. Makeup blender sponges When we hear the word makeup sponge, the first thing that comes to mind is a round, reusable sponge, much like the original Beauty Blender and the other sponges inspired by it. These sponges are meant to be used damp to apply and blend complexion makeup. You wash them with soap and water after every use. You can use the same sponge again the next time you do your makeup. These reusable sponges are fantastic for complexion makeup. They blend away streaks and harsh lines, and because they’re damp, they don’t absorb your foundation. The water in the sponge helps add more moisture and glow to the foundation, contributing to a healthier and more natural finish. Disposable sponges Before blenders became standard in all of our makeup kits, many women were using disposable sponges to do their makeup. They were usually wedge shapes, but occasionally you could also come across flat sponges. They were never especially popular in French beauty since French women preferred to use their fingers to apply their makeup. Some brands market their wedge sponges as reusable. In practice, they’re usually flimsier and more likely to harbor bacteria compared to makeup blender sponges, so while you might be able to wash and reuse them, we don’t recommend keeping them around for long. These days, many makeup artists still use disposable wedges. They can just throw them away instead of having to carefully sanitize a reusable sponge for their next client. They work well in a pinch, although their smaller size and straight edges mean that getting a seamless blend takes a little longer. How to use a makeup sponge for foundation makeup This is the French approach to using a makeup blender for natural-looking makeup. It works whether you use a foundation or a product with lighter coverage like tinted moisturizers or BB cream. Always start with clean and very well-moisturized skin. If you want, you can even use your sponge to apply your skincare steps! Next, soak your sponge with water until it doubles in size, and then wring out the excess, so it’s damp but not dripping. Dispense your cream or liquid foundation makeup on the back of your hand. The heat from your skin will help warm it up so it’ll glide more easily. Dip the sponge into the makeup on your hand. Start with the area of your face where you would like the most coverage, and gently bounce the sponge over your skin. Never drag the sponge over your skin since that can leave visible streaks. Use overlapping bouncing motions to spread your foundation and to give your skin a seamless, poreless blend. If it looks like you’ve overapplied makeup to any part of your face, use one of the sponge’s clean sides to blot away the excess and to prevent a cakey look. Applying concealer with a sponge Many French women use concealer instead of foundation since they can just dab it where they’d like to even out their skin tone a little. Getting a concealer to blend into bare skin isn’t always easy, but with a makeup sponge, it’s a piece of cake! It’s best to apply concealer directly to the area that needs the added coverage, either with a brush, a finger, or the applicator that comes with your concealer. Then, use the clean, pointed end of your damp sponge to blend out the concealer into the rest of the skin so it becomes truly undetectable. Using a makeup sponge for blush and contour Powders aren’t especially popular in French beauty because they can leave the skin looking too matte and dry. Instead, cream blushes, bronzers, highlighters, and contour makeup are much more common. Using a sponge blends out those colorful, precise complexion products in a way that gives them a skin-like finish. As with concealer, it’s best to first dab the product on the skin, concentrating on the areas where you want it to be more saturated. For blush, that means the apples of the cheeks, while for contour or bronzer, it usually means below the cheekbone and along the temples. Using a clean side of the sponge, gently tap over them to blend, and add a bit of a dragging motion if you also want to distribute the product further out. Finally, if you think your blush or contour is a little too dark or vibrant, you can actually dip the sponge into a bit of your foundation and concealer and then bounce it over the makeup. It’ll help to soften the blush, as though it’s emanating from within your skin. Soak it up When you use it correctly, a sponge is the ultimate makeup aid. No other tool can blend things quite so seamlessly for natural-looking makeup every time. Use it damp, and that added moisture will help you realize all of your French beauty fantasies!

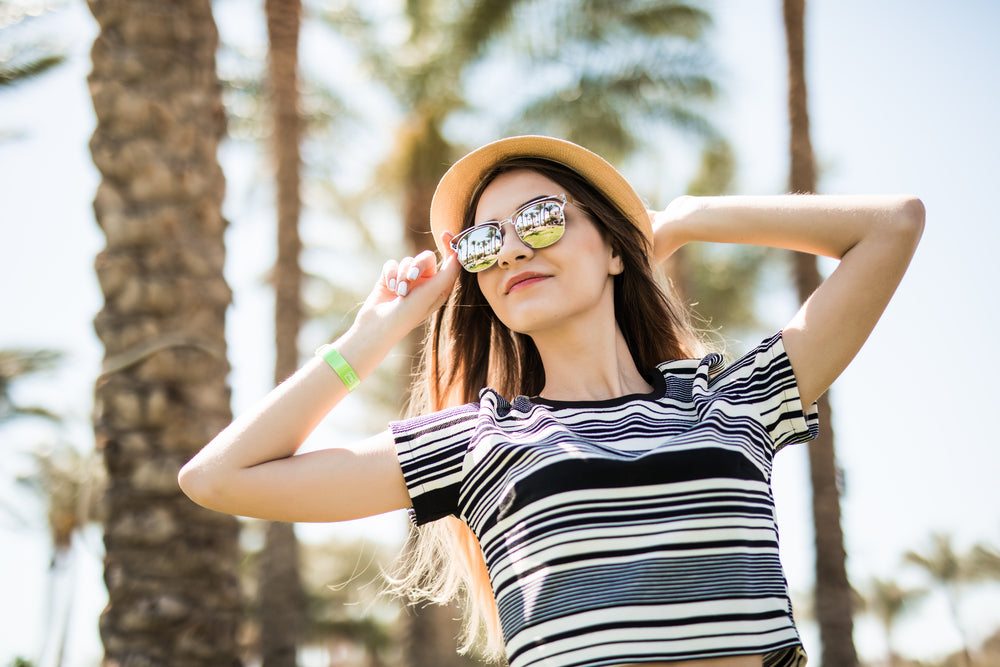
Everyone looks forward to the summer, don’t they? It’s the time of ditching all those winter layers, heading off on vacation, lazing by the pool, soaking up the sunshine, eating ice cream, and watching the sunset in all its glorious colors. But if there’s one thing we don’t love about the warmer weather, it’s what it does to our makeup! Finding the right makeup for hot weather can be a real struggle. If you don’t know what products to use, the high temperatures and humidity will make applying your makeup a challenge. To top things off, it can quickly melt off your face in minutes once you walk out the door. While you can’t control the weather, you can control the makeup you put on your face. And there are plenty of tips to help you look your best during the warmer weather. Here are some great summer makeup tips you need to know, so you can be ten steps ahead when the sunshine finally says hey. Prep is key When the weather is hot, it’s essential that you properly prep your skin before even thinking of putting makeup anywhere near it. This is because when you have the right base, your makeup will sit nicely on your skin and last longer. So, what do you need to do? Be sure to thoroughly cleanse your face and neck in the morning with your favorite cleanser. This will help remove any oil or perspiration before you start applying your skincare and makeup. And remember, prep really begins the night before. Make sure you’re removing your makeup at the end of the day, cleansing and toning your face, and applying a good night cream to replenish and nourish your skin while you sleep. This way, you’ll wake up with less work to do and set yourself up for success. Use an oil-free moisturizer There are two main types of moisturizers out there: 1. Water-based moisturizers2. Oil-based moisturizers Oil-based moisturizers are great for people who tend to suffer from dry skin. However, even if that’s you, when it’s warm, your body will perspire and produce more oils than it usually does. Chances are, you won’t need as much hydration as you do in the colder months. This means you can swap out your oil-based moisturizer for a water-based one. This will reduce the amount of oil and shine on your face, and help your makeup stay firmly in place throughout the day. Add SPF Of all the summer makeup tips on the list, this one is paramount. Aside from sunburn, the sun can do real long-lasting damage to our skin over time if we don’t protect it properly. That means wearing SPF (at least factor 25) every day underneath your makeup is the best thing to do. And try not to let this slide once the weather cools down again. Ideally, you should be wearing SPF every time your outside for long, because even if you can’t see the sun, it’s still there! Many women skip sunscreen because it adds another step to their already hectic morning routine. But the great news is, there are so many skincare products on the market today that have SPF added into them, so you can save time and protect your skin. So if you’re looking to save time and create a simpler summer makeup routine, look out for products like this. Invest in a primer Primer is a must for the warmer weather. It’s light, easy to apply, and will really help your makeup stay in place the whole day. Apply a thin layer of your favorite primer after your moisturizer, and before you add any makeup. Wear less makeup If you want to completely avoid your makeup from creasing, caking, and sliding in the warmer weather, you’re better off wearing as little makeup as possible! We can give you all the tips in the world to help your makeup stay in place, but there’s only so much you can do to prevent this from happening. So if you want to avoid the hassle altogether, try stripping down your makeup routine to the bare essentials. When it’s hot, you don’t want to cover your face in products because your skin will struggle to breathe. If you still want some coverage, try a BB or CC cream or a tinted moisturizer. If you have stubborn dark circles or pigmentation, and you just can’t ditch your concealer, opt for a waterproof version instead. Less is more ladies! Use a waterproof version of your favorite mascara If there’s one thing we can’t leave the house without, it’s a coat of mascara. But the last thing you want is to have panda eyes by lunchtime! That’s why waterproof mascara is one of the makeup essentials for summer. It won’t smudge or budge an inch and will keep you looking fresh-faced and bright-eyed all day long. Plus, it’s the perfect companion if you enjoy swimming or dipping in the ocean while on vacay. The only snag is it’s a little more difficult to remove at the end of the day, but the right makeup remover will do the trick, and if you ask us, it’s totally worth it! Less shine, more glow When it’s hot and humid, your t-zone is likely to take the brunt of it. But a greasy, shiny forehead is not a look any of us want! This is where blotting papers become your new best friend. They’re inexpensive and super simple to use. Keep a small pack of them in your handbag, so you can eliminate shine throughout the day. If you want to re-apply your makeup, blot your face first, then go for it. Swap lipstick for a lighter lip gloss The summer months call for a more subtle, dewy look, so why not try swapping your regular matte lipstick for a lighter shaded gloss? This will add moisture and just a hint of color which you can layer up as you like. We swear by this volumizing lip gloss for soft, plump & kissable lips. Invest in a mist with SPF Did you know that you’re meant to reapply SPF every 2 hours if you’re continually out in the sun? Nobody has time (or the patience) for that. Plus, reapplying sunscreen on top of your makeup is a recipe for disaster. Don’t worry, we’ve found a workaround! Stock up on a refreshing setting spray or mist that comes with the SPF you’re looking for. One spritz and you’re beach ready. Remember: less is more! Of all the summer makeup tips out there, the most important one is to remember that less really is more. And the less time you spend applying your makeup, the more time you’ll have to sunbathe at the beach and soak up the gorgeous rays!
As the weather starts getting warmer, we’re ready to change up our look! For us, timeless summer looks have to be a little lighter and softer, as opposed to the darker colors we favored in the winter. However, just because we prefer a more natural summer makeup look, doesn’t mean we’re giving up on any of the beauty or glamour. Makeup for hot weather shouldn’t feel heavy, but it can still pack a punch. That’s why we’ve selected our favorite summer makeup looks for 2021. Have a look at the photos to get inspired, and then follow our tips so you can try these makeup looks for yourself. Glowy and natural To start, let’s talk about natural summer makeup looks that help you feel cool and refreshed no matter how hot it gets outside. This stunning look is ideal for daytime, with a focus on healthy, glowy skin and bright, vivacious eyes. To achieve this look, start with a good canvas of well-prepped skin. Don’t skimp on moisturizer and sunscreen, especially if you’ll be spending any time under the sun. Use just a hint of tinted moisturizer to even out the skin tone, and then build up layers of bronzer and highlighter for that sunkissed, glowy look. If you don’t have a liquid highlighter on hand, a dab of shimmery gloss can totally do the trick! To make the eyes pop, frame them with a lengthening Vivienne Sabó mascara. The newest addition to our mascara collection, the Polynésie Francaise is ideal, because it offers natural length with water-resistant and non-flaking formula. Finally, fill in your brows, and then brush them up for that fluffy look. Our Brow Arcade pencil comes with a comb on the end, so it’s perfect for the job. Feeling pink If you’d like to have a bit of fun with your eye makeup without necessarily spending ages on eyeshadow, get inspired by this makeup look! Pops of color are going to be everywhere in 2021. A swipe of pink along the lash line is a great way to rock the trend without feeling silly or overdone. This look isn’t quite as glowy as the previous one we showcased, but otherwise, the two are quite similar, with a more natural vibe. Just use a slightly more dramatic Vivienne Sabó mascara, like the volumizing Provocation. Finish things off with a dose of a more pigmented pink lip gloss, like our Le Grand Volume in Raspberry, to match the eyes. Nude glam This is one of those timeless summer looks for the evening. It’s elegant and polished, with a refined glamour that’s never in danger of looking like too much. This kind of nude glam look is fitting for any occasion, including a day at the office or a night at the opera. Because the colors used in this look are natural, it’s possible to slightly amp up the intensity of both the eyes and the lips. For the eyes, a shimmery champagne shade is ideal for the lids while brown eyeshadow helps to contour the crease. Finally, a soft Feutre Fin wing is essential for framing the eyes, along with a few coats of mascara. To give the lips that glossy fullness, the secret is to first use a warm nude lip pencil to contour the lips. Then, a coating of our Polynesie Francais gloss in Tahiti completes the look with a radiant sheen. Soft and smokey If you want smoldering makeup for hot weather, a soft smokey eye is our favorite. It’s an alluring and irresistible look with a lot of sex appeal. Because it relies on brown eyeshadows, it doesn’t have the heaviness of a black smokey eye. As with all of our favorite summer makeup looks for 2021, the base here is also natural, soft, and incredibly glowy. The eyes are the focus, of course, so apply a soft, shimmery brown to bring out the lids. Then, in the crease, apply a medium brown shade that’s just a little darker than your skin tone. Use that same color all along your lower lash line, to create that smokey effect. Finally, use a darker brown shade to deepen the outer corner of the eye and the crease. To finish things off, apply your liquid liner in a very thin line, right along both the top and bottom lash lines. Finally, apply a generous coat of Vivienne Sabó mascara, and a light dab of nude gloss on the lips. Peachy keen A softer way of adding color to your summer eye makeup is to use peach! The vibrant color looks incredibly natural against the skin and adds a touch of warmth that’s perfect for the season. It’s universally flattering, and because of its orange base, it really makes blue eyes pop. This monochrome look is a great way of making this color work! There’s no need for eyeliner—just a swipe of peach over the lids and across the cheekbones. A coat or two of mascara and a touch of warm lipstick like our Matte Constance in Warm Pink finish the look. Summer night glam Red lipstick fits every season. It’s elegant and eye-catching, so it’s perfect for a classy summer soirée or romantic dinner date. In true French beauty fashion, this timeless summer look also features a subtle black wing and perfectly groomed brows. To make this work for you, choose a red lipstick with rich depth, like our Matte Constance in Classic Red. A dab of gloss only at the center of the lips adds a reflective touch that makes the lips look a little bigger and fits in well with summer 2021 trends. Bringing the heat The best season of the year is just around the corner, and with these makeup looks, we’ll be bringing the heat! Sure, there’s no reason why you can’t wear these timeless summer looks during other seasons, but to us, they perfectly capture everything Vivienne Sabó loves about the warmest season. They’re light, fresh, and timelessly beautiful.