


9 Mascara Mistakes That You Need to Stop Making
Mascara is that special touch that ties every makeup look together. Without its darkening, lengthening effect on the lashes, eyes can look bare and small, so it’s key in nearly every beauty look.
However, applying mascara poorly is worse than not applying it at all. Clumpy lashes and smudgy lids can ruin an entire look, and there are even some mascara mistakes that can lead to eye infections.
That’s why you shouldn’t play games when it comes to mascara. We’ve collected our best mascara tips to help you avoid the most common mascara mistakes, so you can always bat your lashes with confidence.
1. Leaving too much mascara on the wand
 If you want to learn how to apply mascara without clumping, remember to always wipe down your mascara wand. This crucial step is often forgotten. It’s easy to miss in the excited rush to lengthen those lashes. However, a mascara wand that’s too saturated is guaranteed to cause clumping.
From now on, immediately after unscrewing your mascara cap, gently wipe the wand over the lip of the tube. Pay special attention to the tip because that’s where mascara really tends to collect, and if the wand seems especially clogged up, you can wipe it down with a tissue.
This way, when it’s time to apply, you won’t need to worry about big globs of mascara clumping your lashes together.
2. Pumping the wand
 In films, whenever a character goes to put on mascara, she’ll first pump the mascara up and down a few times in the tube. Women all over the world started believing that this was the right way to go about putting on mascara, when in reality, it’s one of the worst mascara mistakes you can make.
In the short-term, it has no benefits. If anything, it just loads up your wand with a massive, clump-causing amount of mascara. In the long-term, it introduces air and bacteria into the precious tube, which significantly shortens the life of your mascara.
3. Using old mascara
 Of all the most common makeup products, mascara has the shortest shelf-life. If you use your mascara after its use-by date, you can run into all kinds of issues. It will get dry, which leads to clumpy lashes, and it may also start harboring bacteria, which can cause styes and painful infections.
Most mascara should be replaced 3-6 months after opening. If you’re worried about forgetting, we’ve set up an auto-subscription system that will send you a new tube of our best-selling Cabaret Premiere mascara every few months.
4. Forgetting to wiggle
 Always remember to give your mascara a wiggle! This classic mascara tip guarantees that your lashes will look both voluminous and separated every time.
When you apply your mascara, give it a small wiggle as it comes in contact with the base of your lashes. This will allow the bristles of the wand to really wedge themselves in between your lashes, coating them thoroughly without clumping them together. Then, as you pull the wand up to coat the length of the lashes, move it in a slight zig-zag motion to keep that momentum going.
5. Only coating one side
 This mascara hack is especially for the blondes and redheads out there, because brunettes can sometimes get away with making this little mistake. When you apply your mascara, you only see the underside of your lashes, so you might forget the top. If you leave the top bare, the second you blink, the natural color of your lashes will be visible, and it’ll take away from the consistency of your makeup.
To cover the top part of the lashes, use the tip of your mascara wand and carefully color it in, especially close to the lashline. Don’t try to build up volume or length from above since it can weigh the lashes down; just focus on coloring things in.
6. Blinking too quickly

It can be tempting to blink immediately after putting your mascara on, but unfortunately, it often results in black smudges on the eyelid ruining your eyeshadow. Not blinking may sound like a tall order, but if you just close your eyes after applying mascara, the issue will be solved. Just wait a few seconds so that when you finally open your eyes, the mascara will be dry and won’t smudge.
7. Applying too many coats

It can be tempting to add coat after coat of mascara, but it rarely works well in reality. Yes, 5-6 coats of mascara will make your lashes look longer and thicker. However, it’s also going to make them look uniformly thick from root to tip, leading to a “spidery” look.
To avoid having your mascara look spidery, you need to exercise restraint. Don’t apply more than three coats to your lashes, and if that doesn’t give you the effect you want, you may just need to switch to a more volumizing mascara.
8. Forgetting to remove it at night
 Sleeping with mascara on is never a good idea. In the best-case scenario, forgetting to remove it at night will just dry out your lashes, cause a few to fall out, and leave a few marks on your pillow. But it can also lead to eye irritation and even eye infections. This is another serious mascara mistake, so make sure to remove your eye makeup thoroughly every night with a high-quality makeup remover.
9. Using the same mascara for all occasions
 Wearing the same mascara all the time isn’t the biggest mascara mistake you could make, but it can get boring. Tailor your mascara choice to each event!
- A lengthening and separating mascara is best for day-to-day.
- Waterproof mascara is a must-have for beach-side vacations or rainy days.
- For date nights and parties, emphasize your eyes with a volumizing mascara.
- For upscale evening events, when you want maximum drama, double up! Start with a coat of waterproof mascara for a separated, waterproof base, and then add a coat of volumizing mascara for a false-lash effect.
Now that you know all of our favorite mascara tips, no more faux pas!
The modern skincare world can seem incredibly complicated, with a ton of different products and so much advice. The French skincare routine is much easier compared to some of the 10-step routines we’ve been seeing online! In reality, there are a few different ways to achieve healthy skin, so our goal is to help you with simple yet life-changing advice. When it comes to French beauty, it’s not only about your specific products but also how you use them! With these easy skin care tips, you’ll be able to make the most out of your beauty routine. French pharmacy brands In France, most women buy their skincare products at the pharmacy, and French pharmacy brands are an important staple in most French skincare routines. These brands are renowned for formulating gentle products that are suitable for sensitive skin, and for investing a lot of money in clinical research. While French pharmacy brands put a large emphasis on science, their products still contain a lot of lovely natural skin care ingredients that have their own nourishing effects on the skin. Be consistent French skincare comes at all kinds of price points, and contrary to popular belief, more expensive doesn’t always mean better. That’s why another one of our most important tips for great skin is to be consistent, no matter what products you decide to use. Cultivate skincare as a habit that you do every day, without changing up your products too much from day-to-day. Remove your makeup and moisturize every night, and wear sunscreen every morning. This consistency will pay off in the long term, by keeping your skin at optimal health for years to come. Cleansing should be gentle One of the most important French beauty secrets to healthy skin is gentle cleansing, no matter your skin type. In many countries, those with oily skin resort to scrubbing their face with harsh, stripping cleansers that throw their skin off balance, leading to irritation, breakouts, and more oiliness. However, in the best French skincare routines, cleansing is gentle and usually done with creamy milk cleansers. These days, oil cleansers and micellar water are also incredibly popular, but the key is to avoid any harsh, foaming cleansers. Moisturize damp skin Another easy skincare tip that makes a big difference is to apply moisturizer to the skin when it’s damp. This also applies to serums, essences, and any other hydrating skincare steps, although in French beauty, it’s okay to keep things minimal. Water makes the skin more permeable, so moisturizing agents sink in more deeply instead of sitting in a layer on top of the skin. The result is bouncy, more hydrated skin that feels soft to the touch but never greasy. Don’t neglect the neck and decolletage The skin doesn’t stop at the face! The French skincare routine extends from the face to the neck and chest, since those areas are all actually quite similar when it comes to skin thickness and level of exposure to the elements. Make sure to use your cleanser, moisturizer, and sunscreen from the face all the way down to your decolletage. It’s particularly important if you rely on your skincare routine to prevent premature signs of aging. If you forget to care for your neck, it’ll be an instant giveaway. Nurture your body with oils The rest of the body also deserves some attention, although it doesn’t necessarily need the same products as the delicate skin on the face and neck. The skin on the body is a little thicker and it’s usually less prone to acne, which is why French women love to nurture it with body oils rich in beneficial fatty acids and regenerative antioxidants. Just as with the face, the body is also most ready to accept moisture when it’s damp. The best time to use body oil is immediately after the shower when the skin is totally saturated with water. Using oil immediately after will help to prevent that water from evaporating, which will leave the skin hydrated and soft. Skincare can be aromatherapeutic This skincare tip won’t work for everyone, but for many French women, it’s what makes their beauty routine so fun. France has a centuries-old tradition of perfumery, essential oil production, and aromatherapy, which also touches into the skincare world. While the benefits that essential oils have for the skin are debatable, it’s undeniable that they can have a beneficial effect on the mood. Lavender is incredibly calming while rose essential oil can make you more cheerful. Using natural skincare with essential oils can have a positive impact on your mental health, and it can also simply make the skincare experience more sensorial and enjoyable! If your skin is sensitive to fragrances, try lighting a scented candle while doing your beauty routine, instead. Go all-out with the occasional treatment While consistency is important, treating yourself to some extra self-care can also be beneficial! In general, it’s not great to surprise the skin with new products, but a few times a week, you should exfoliate or mask your skin and give yourself a longer-than-normal massage. While these added treatments aren’t mandatory for healthy skin (it’s what you do every day that really matters), they’re still an easy way to amp up your glow and to feel pampered. It’s not all or nothing Since consistency is so important, we also want to reinforce that skin care is not all or nothing! While a multi-step routine with double cleansing, toning, multiple serums and creams can be nice, you’re also allowed to keep things basic and even to take shortcuts. Having a few pre-planned shortcuts, like a bottle of micellar water in a cupboard for easy makeup removal or a bottle of face lotion near your bed can go a long way towards helping you maintain your consistency on nights when you’re too tired to go all-out. Simple skin care success Skin care is highly individual since each person has a different skin type and slightly different concerns. However, our tips for great skin are universal, because no matter who you are or what your budget is, you deserve to have healthy, well-cared-for skin!

Ever wondered how to dress like a French woman? There’s something about Parisian style that’s just so captivating. The barely-there makeup, the sophisticated yet comfy clothing, and the carefree attitude to boot. How do they do it? Since the days of Brigitte Bardot and Jane Birkin, French-style clothing has been firmly on the fashion map. It’s classic at its core, mixed with an element of surprise and freshness. Every outfit appears timeless, yet totally on-trend, which means they never go out of style. French women are known for placing quality over quantity. Less is definitely more. They choose clothing that feels comfortable and will last them years over trendy pieces that come and go. If you’re looking for some inspiration when it comes to French outfits, you’re in the right place. Here are our favorite traditional French outfits that any woman can try. Are you ready to master French-girl fashion? Glastonbury chic (day dress & blazer) Every French woman has at least one trusty blazer in her wardrobe. Not sure which one to go for? A classic herringbone will give you a vintage feel, while a block color black or navy will look more formal. Pro-tip: If you want to save yourself some cash, raid your partner’s or friend's wardrobe instead! An oversized masculine blazer will channel Isabel Marant’s infamous catwalk style. This is a must-have piece in every cool French girl’s closet. Pair your blazer with your favorite day dress for an eclectic, playful outfit. Finish with tousled hair and some sunglasses, and you’re Paris ready. Date night (straight-leg cropped jeans & a satin cami) Classic French style is all about surprising people, and blurring the lines between casual and formal wear. If you’re looking for a casual going-out look, the French-girl go-to is a pair of straight-leg cropped jeans and a glamorous top. Think silky and satin fabrics, lace, and sexy spaghetti straps. If there’s one thing French women love it’s opulent fabrics. Silk is always a must-have. It looks beautiful and feels oh-so-soft against your skin. When it comes to jeans, French ladies aren’t a big fan of skinnies. They favor a looser fit and cut, creating a more relaxed silhouette. Complete this look with a pair of strappy sandals—perfect! Sleek soirée (slip skirt & mules) The slip skirt and mules look became popular a few years ago and hasn’t gone away since. This look is comfortable, practical, and just a little sexy. Not too sexy though—French women are all about leaving plenty to the imagination. When it comes to choosing a slip skirt, let your imagination run wild. Choose any print, color, or fabric you like. Pair with a comfy pair of mules that will take you from the office to a cocktail party without having to go home and get changed. That means more time having fun! We love this outfit already. Summer staple (classic printed wrap dress & tan shoes) The wrap dress originated in the US, but has quickly become synonymous with classic French style. Why do French women love this item of clothing? It’s universally flattering. No matter what shape or size your body is, a wrap dress will hug you in all the right places and accentuate your fabulous feminine curves. This is a beautiful spring/summer look. Choose a dress in a gorgeous floral print or in a pop of color. Pair with classic espadrille wedges, a woven bag, a dainty piece of jewelry, and a pinch of pink blusher. And voilà! Classic comfort (marinière & ballet flats) When you think of French clothing, you may picture a blue and white striped top. Is it a cliché? Yes. But do French women love a blue and white striped top? Yes, they do! In France, it’s known as a marinière top. It originated from Bretagne where they were first popularized by the label Saint James, who took inspiration from local sailors. There isn’t a more traditional French outfit than this one right here. You’ll find blue and white striped tops in so many cuts and fabrics everywhere. Take your pick. Pair this top with a classic and comfy pair of ballet flats. You’ll look like a true local in Paris. The go-to dress (LBD & your favorite handbag) The little black dress is a staple item in every woman’s wardrobe across the world. But French women get the most wear out of their LBDs. How? They wear this versatile dress on a job interview, in the office, on a date, at a cocktail party, and so much more. It’s their go-to dress whenever they’re unsure about what to wear. The secret all comes down to accessorizing. For a daytime look, pop a trench coat or cardigan over your LBD and pair it with ballet flats or sandals. At night, swipe on some voluminous mascara and a bold red lip (we love this one), step into your favorite heels, grab your favorite handbag, and you’re runway ready! Office chic (button up shirt & tailored trousers) No French-girl’s wardrobe would be complete without a classic white or blue Oxford shirt. This is another staple item inspired by menswear (and another great reason to raid your man’s wardrobe!) Pair with jeans for a more casual look, or with a plaid blazer or tailored trousers for an effortless office outfit. French women love tailored clothing because of the fit. This is how they always look so chic—they invest in clothing that fits them like a glove. Bond girl off-duty (a black jacket & plain white tee) A plain white t-shirt is mandatory in every person’s wardrobe. Stock up on a few quality ones that will last a long time and go with pretty much everything in your wardrobe. Looking for a glamorous, off-duty look? Pair your classic white tee with a tailored black smoking jacket. The original one was made by Yves Saint Laurent, but there are plenty of affordable versions to suit your budget. This jacket is likely to last you forever and is definitely worth investing in. Cute & cozy (the oversized sweater & a mini skirt) The oversized sweater is an item that French women popularized before anyone else. It gives you a casual, carefree, masculine-vibe look. It’s sexy because you’re not trying to be sexy at all—this is French women in a nutshell. A comfy oversized sweater is perfect to transition from summer to fall. Be sure to choose a color that will work with lots of other items in your wardrobe. Pair with a cute mini skirt in faux leather or suede. If you prefer a longer length, a pencil or maxi skirt in a floaty fabric will work too. A French-girl’s best friend (the beige trench coat & a silk scarf) Finally, on our list of French outfits we love, is the trench coat paired with a classic silk scarf. A beige trench coat is every French-girl’s best friend all year-round—because the weather is so unpredictable! If the Burberry version is out of your budget, look to the high street for something more affordable. What matters is it’s practical, comfortable, and well-made. You want this coat to last you for years. Silk scarves are a popular accessory with French women, elegantly completing any look. This is one item where you are encouraged to go for a bright color or crazy pattern. It’s a little flash of playfulness that will top off any outfit. And that’s our ten favorite French outfits!
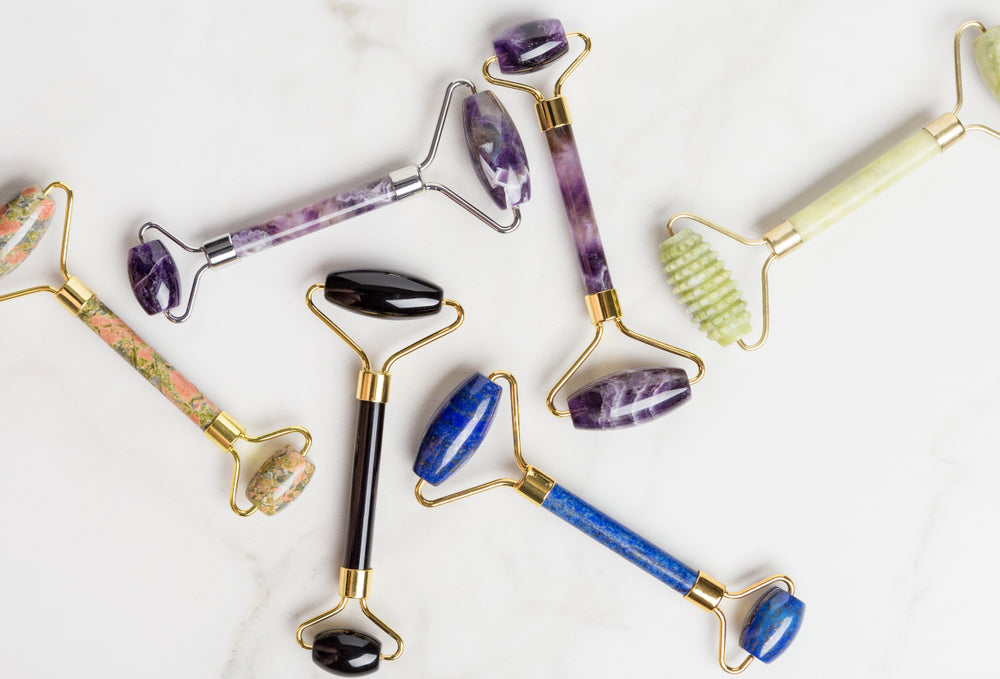
In French beauty, the skin is always the star. French women rarely cover their faces with more than a sheer tinted moisturizer. Instead, they focus on achieving healthy skin with great skincare and an invigorating daily facial massage. While the hands are the traditional tool of French aestheticians, facial rollers have been a welcomed addition to French women’s daily skin care routines. If you’d like to add a face roller to your beauty routine, as well, keep reading! We’ll help you learn everything you need to know about how to use a face roller for maximum effects. The benefits of face roller massage Using a face roller on a regular basis has immense wellness benefits. It goes beyond just the skin — the effects of a facial massage have physical impacts below the epidermis. The rolling motion of a facial roller exerts less pressure on the skin than a traditional face massage, so it yields results quicker and is more gentle. Face rollers are inherently cool, so they have a soothing effect on the skin. You can boost this effect by keeping your face roller in the fridge. They tone the face and eliminate puffiness by moving and draining lymphatic fluid. They give facial muscles a relaxing massage that helps to drive away tension, especially from the jaw and temples. The massage improves blood circulation to the skin, which gives a youthful glow and may have long-term anti-sagging effects. The gentle massage helps skincare products penetrate into the skin more quickly and deeply. How to choose the best face roller When selecting the best face roller for you, consider what kind of features you’re especially interested in. Some stones do a better job of staying cold, while others have a smoother surface that’s more gentle on the skin. In general, we recommend purchasing a double-sided roller, with a large side for rolling over the face and a smaller one for around the eyes. Jade rollers are the classic choice, as they were the first facial rollers available on the market, and they’re quite affordable. They’re lightweight compared to other stones, but they’re also a hint quicker to lose their smoothness. Rose quartz facial rollers have become more popular in recent years. They’re a little heavier than jade rollers so they can exert more pressure on the skin, but they also stay cold for longer and are generally more durable. Amethyst rollers are the new thing in the facial roller scene. They’re structurally similar to rose quartz, but they’re quite expensive. The companies producing them often put more effort into manufacturing, so they’re usually smoother and less likely to make noise. Finally, there are ice rollers. They have a liquid core that turns to ice if you put them in the freezer. Using one is like getting an ice facial that rapidly cools the skin. They soothe irritation and reduce puffiness, but the cold shock can be too intense for daily use. How to use a face roller When not in use, keep your facial roller in the fridge, especially in the summer when the cold can be very refreshing. Always start with clean skin. The face roller will glide more easily if it’s also covered in a thin layer of moisturizer or face oil. If you’re a fan of sheet masks, you can use your facial roller on top of the sheet mask to allow the essence to soak in more thoroughly. Once you’re ready to roll over the face, remember this basic principle: Always start in the middle and work outwards and upwards, mirroring your motions on both sides of your face. You can roll along each area as many times as you like. Start at the neck, rolling upwards towards the jawline. Next, starting at the point of your chin, roll outwards following the curve of your jawline. Bring the roller up a bit, and roll in the same way over the chin and above the curve of the jawline. Then, roll along the cheeks, starting near the nose and going outwards. Roll over the forehead in upward lines, from above the brows up to the hairline. Flip your roller over to use the smaller side above the upper lip, along the sides, and up the bridge of the nose. To roll around the eyes, start below the eye’s inner corner and move outwards in a circular motion following the orbital bone. How to take care of your face roller As with anything that comes in contact with your skin, you should thoroughly clean your face roller after each use. Since it’s a non-invasive tool, you can simply wash it in warm water with a bit of soap or detergent. Then, towel-dry gently or place it somewhere safe to air-dry. How often should you use a facial roller? A massage with a face roller is a safe daily habit that’s incredibly gentle on the skin. Some women swear by using their jade roller twice a day, but once a day or week will also give you satisfying results. Even if you don’t have the time to use it every day, keep it around for the days when you feel like your skin needs that extra cooling, firming touch. Savoring the ritual French beauty practices are steeped in history, but we love updating them with new tools. A jade roller’s relaxing touch is the perfect upgrade, boosting your skin care practice and soothing the skin. That daily French ritual of facial massage becomes quicker and easier, and amidst your long, busy days, what more could we want?