


Upgrade Your Daily Massage with a Face Roller
In French beauty, the skin is always the star. French women rarely cover their faces with more than a sheer tinted moisturizer. Instead, they focus on achieving healthy skin with great skincare and an invigorating daily facial massage.
While the hands are the traditional tool of French aestheticians, facial rollers have been a welcomed addition to French women’s daily skin care routines. If you’d like to add a face roller to your beauty routine, as well, keep reading!
We’ll help you learn everything you need to know about how to use a face roller for maximum effects.
The benefits of face roller massage
 Using a face roller on a regular basis has immense wellness benefits. It goes beyond just the skin — the effects of a facial massage have physical impacts below the epidermis.
-
The rolling motion of a facial roller exerts less pressure on the skin than a traditional face massage, so it yields results quicker and is more gentle.
-
Face rollers are inherently cool, so they have a soothing effect on the skin. You can boost this effect by keeping your face roller in the fridge.
-
They tone the face and eliminate puffiness by moving and draining lymphatic fluid.
-
They give facial muscles a relaxing massage that helps to drive away tension, especially from the jaw and temples.
-
The massage improves blood circulation to the skin, which gives a youthful glow and may have long-term anti-sagging effects.
- The gentle massage helps skincare products penetrate into the skin more quickly and deeply.
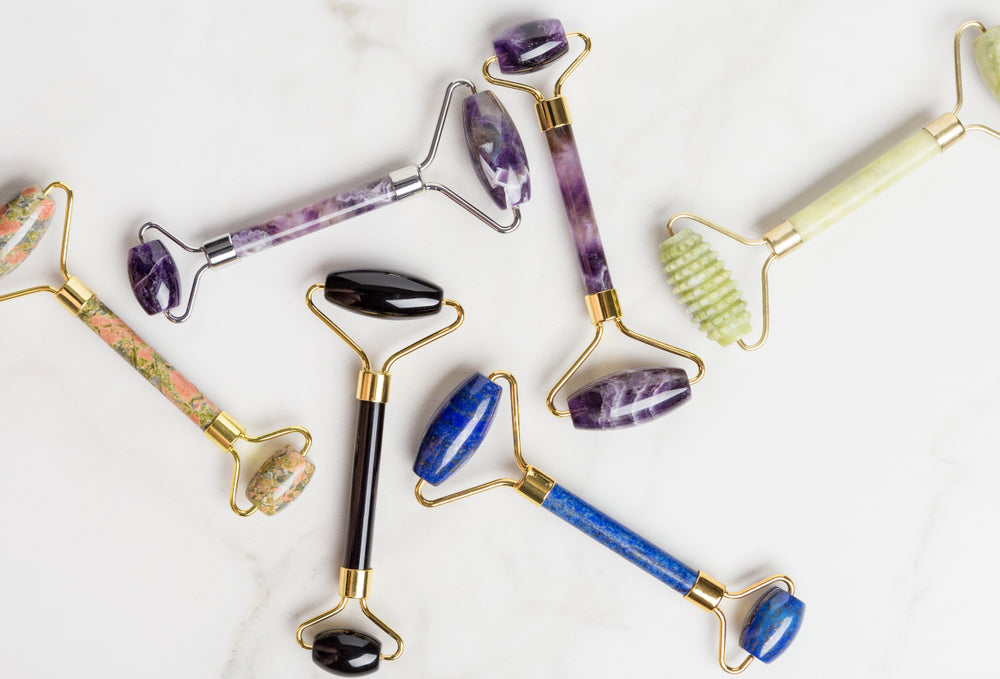
How to choose the best face roller

When selecting the best face roller for you, consider what kind of features you’re especially interested in. Some stones do a better job of staying cold, while others have a smoother surface that’s more gentle on the skin.
-
In general, we recommend purchasing a double-sided roller, with a large side for rolling over the face and a smaller one for around the eyes.
-
Jade rollers are the classic choice, as they were the first facial rollers available on the market, and they’re quite affordable. They’re lightweight compared to other stones, but they’re also a hint quicker to lose their smoothness.
-
Rose quartz facial rollers have become more popular in recent years. They’re a little heavier than jade rollers so they can exert more pressure on the skin, but they also stay cold for longer and are generally more durable.
-
Amethyst rollers are the new thing in the facial roller scene. They’re structurally similar to rose quartz, but they’re quite expensive. The companies producing them often put more effort into manufacturing, so they’re usually smoother and less likely to make noise.
- Finally, there are ice rollers. They have a liquid core that turns to ice if you put them in the freezer. Using one is like getting an ice facial that rapidly cools the skin. They soothe irritation and reduce puffiness, but the cold shock can be too intense for daily use.
How to use a face roller

-
When not in use, keep your facial roller in the fridge, especially in the summer when the cold can be very refreshing.
-
Always start with clean skin. The face roller will glide more easily if it’s also covered in a thin layer of moisturizer or face oil.
-
If you’re a fan of sheet masks, you can use your facial roller on top of the sheet mask to allow the essence to soak in more thoroughly.
- Once you’re ready to roll over the face, remember this basic principle: Always start in the middle and work outwards and upwards, mirroring your motions on both sides of your face. You can roll along each area as many times as you like.
-
Start at the neck, rolling upwards towards the jawline.
- Next, starting at the point of your chin, roll outwards following the curve of your jawline.
-
Bring the roller up a bit, and roll in the same way over the chin and above the curve of the jawline.
-
Then, roll along the cheeks, starting near the nose and going outwards.
-
Roll over the forehead in upward lines, from above the brows up to the hairline.
-
Flip your roller over to use the smaller side above the upper lip, along the sides, and up the bridge of the nose.
- To roll around the eyes, start below the eye’s inner corner and move outwards in a circular motion following the orbital bone.
How to take care of your face roller
As with anything that comes in contact with your skin, you should thoroughly clean your face roller after each use. Since it’s a non-invasive tool, you can simply wash it in warm water with a bit of soap or detergent. Then, towel-dry gently or place it somewhere safe to air-dry.
How often should you use a facial roller?

A massage with a face roller is a safe daily habit that’s incredibly gentle on the skin. Some women swear by using their jade roller twice a day, but once a day or week will also give you satisfying results. Even if you don’t have the time to use it every day, keep it around for the days when you feel like your skin needs that extra cooling, firming touch.
Savoring the ritual
French beauty practices are steeped in history, but we love updating them with new tools. A jade roller’s relaxing touch is the perfect upgrade, boosting your skin care practice and soothing the skin. That daily French ritual of facial massage becomes quicker and easier, and amidst your long, busy days, what more could we want?
Perfect winged liner is one of the most challenging makeup techniques to master. At first swipe, you end up with an overly subtle winged eyeliner, so you decide to add just a touch more, and next thing you know, you’ve overdone it… Don’t even get us started on getting both eyes to match! The only thing that might be tougher than winged eye makeup is a vivid red pout, so it’s funny how one of our favorite go-to looks in French beauty is a combination of these two. Through years of practice, we've refined our skills and uncovered some of the best winged eyeliner hacks that make achieving that subtle wing a little easier. Today, we’ll be sharing all of our tips with you! What kind of winged eyeliner look do you want? Are you aiming for a natural winged eyeliner look, or would you prefer a dramatic cat eye? Winged eyeliner comes at a few different intensity levels, and the angle of your wing will have a big impact on your look. These days, the sharp “fox” winged eyeliner look has become especially popular, but we’re still enamored with the subtle winged eyeliner of the ‘40s and the sultry winged eye makeup of the ‘70s. While you do need to decide on the kind of look you want, our tips will help you achieve the perfect winged eyeliner every time. Winged eyeliner for different eye shapes Taking your eye shape into account will help you figure out how to master the wing since when you draw on a liquid liner, you’re effectively changing the borders of your eye. The more sharply angled your eyeliner, the more upturned your eyes will look, while if you go horizontal, they’ll look a little sleepy and sultry. As for the lash line, a rounded shape will make the eyes look doll-like, while progressing from thin to thick towards the outer corner will make the eyes look almond-shaped. What about the inner corner? In classic French beauty, we like to stop the eyeliner before the inner corner, and sometimes even at the eye’s center; this opens the eyes and gives the face a very fresh look. However, in recent years, it’s become trendy to aim for a sultry look by bringing the eyeliner all the way down to the inner corner in its own little wing. Feel free to experiment and see what style you like best! Choose the right eyeliner Liquid and gel eyeliners are the ideal choice for a winged look, but some are easier to work with than others. Gels usually come in a pot, so they require a separate brush, which can be inconvenient at times. As for liquids, many come with ultra-thin brush applicators that are difficult to control. Felt-tipped pens, like the Feutre Fin, are ideal. With a tapered, sturdy felt tip, a pen eyeliner offers a precise wing but can still cover a lot of space when necessary. Keep your distance from the mirror This is one of our most useful winged eyeliner tips, so read closely. Instead of holding your mirror close to the face as you draw on your eyeliner, take a step back. This will allow you to see both of your eyes simultaneously, which is essential for achieving perfectly symmetrical eyeliner wings. Otherwise, working too close to the mirror can easily result in two gorgeous eyeliner wings that look nothing like the other – giving you a lopsided look. Steps to a perfect wing Now, for the actual application! If you start with the hard part first, the rest of your winged eye makeup will be a breeze. It just so happens that the most challenging part of winged eyeliner is the wing itself. Start with the eye you usually struggle with, and draw the lower line of the wing by following your lower lash line. Do the same thing on your other eye while checking for symmetry in the mirror. Then, draw on each wing’s top line, creating a little triangle at the outer corner. Once again, do the same on the other eye and check that everything lines up. If your wing is a little more dramatic, you may need to fill it in a little as well. Small lines from outer corner to inner corner Now it’s time to draw your liner over the lash line. To avoid gaps between the liner and your lash line, pull your lid upwards (gently!) as you apply. Then, working from the outer corner inwards, draw the eyeliner on in short strokes. Don’t worry too much about achieving a perfect line yet — once you let go of your lid, you’ll be surprised to see how even and delicate your winged eyeliner looks. You can then correct or thicken up the line after you have that base layer down. Keep the eye open to fit a hooded lid One common struggle many makeup lovers face is how to apply winged eyeliner to hooded eyes. The secret is to draw the top line of your eyeliner wing while your eyes are totally open so that your eyeliner sort of “skips” over the crease. It’ll look like there’s a little step or divet in your eyeliner when your eyes are closed, but when they’re open, it will look incredibly flattering. No more winging it Using liquid eyeliner might seem daunting at first, but with our winged eyeliner hacks and suggestions, we know that not only will you master the wing, but you’ll also refine it to suit your flare.

The color of your lipstick or lip gloss says a lot about you. Your perfect lip color can make you seem seductive, creative, cheerful, flirty, or any combination of traits. As long as you choose a color that fits your attitude on any given day, you can’t really go wrong with your lipstick style. We’ve put together a list of all the most popular lipstick colors, with explanations of exactly what kind of statements they make. Whether you’re looking to find your perfect lip gloss or you’re more into the matte look, keep reading to figure out what shade will give you your most confident lipstick look, no matter what that means to you! Red Red is the most classic and sexiest lipstick color there is. No shade can compare when you want to exude confidence and sensuality in a classy, timeless manner. A woman in red lipstick is ready to face any challenge that life throws at her! It’s a bold color that never goes unnoticed or out of style. While perfecting a red pout can take a bit of work (and a great red lip liner), once you master it, it becomes a huge time-saver! You can look completely made-up and put together even when you’re only wearing red lipstick and some mascara — it’s the ultimate French girl makeup trick. Nude Nude lipstick is a simple yet elegant choice. It gives a polished finish to your look but still allows you to feel comfortable in your own skin. It won’t be obvious to those who look, but you’ll know it’s there, making your lips look smoother and fuller while leaving everybody else guessing. It’s one of the best everyday lipsticks for every occasion because it goes on easily and it’s always flattering. With bold lipstick shades, you have to be very careful to keep a neat lip line, but a nude lipstick blends into your skin and looks like a natural lip color. A quick swipe, even without a lip liner, will always look great. It looks amazing with any makeup style, offering the ideal balance for dark eyeshadow or for bronzed makeup looks. Purple berry A purple berry lipstick is eye-catching in a very chic way. It’s a great shade for a confident lipstick look because it has the same intensity and depth as a red lipstick but with a modern twist. It’s the perfect lip color for the modern woman! Oh, and did we mention that it somehow always makes the teeth look whiter? The best time to rock a purple statement lip is when you want to make a lasting impression, especially if you’re in a creative environment. Art gallery openings and fashion shows are the natural environments for a woman who wears a berry lip. Burgundy A burgundy lipstick is as sultry as a red one, but with an underlying darkness that adds mystery to your look. This lipstick shade brings to mind the gorgeous sirens of 1920s silent films with its seductive depth. It can give your look a moody twist or come off as totally mature, depending on how you style it. You can wear it along with dark eyeshadow for a gothic look, or use it to add an edge to a natural makeup style. As with red lipstick, lining the lips and taking your time is essential! We highly recommend slightly over-drawing the lip line, since such a dark shade can make the lips look a little smaller. Soft pink Soft pink lipstick is nude lipstick’s demure sibling. It has a delicate charm that’s particularly flattering to those with cool undertones. It’s a lovely lipstick style to choose when you’re in a feminine, relaxed mood and you want to exude an image of serenity. Soft pink lipstick is perfect for dates, but it’s also appropriate to wear to class or the office. It’s a nice companion to more intense eye makeup since it’s softness will add balance to your look. Just make sure to choose a pink lipstick that’s at least a shade darker than your skin tone, to avoid looking washed out. Fuchsia Fuchsia is vivid and vivacious, with a feminine twist. This bright shade is at the meeting point between hot pink and bright purple. It’s the best lipstick color when you want to feel flirtatious and playful but also independent and strong. While it might be a little too much for a day at the office, it’s great for wild nights out on the town. It’ll immediately put you in an energetic mood, guaranteeing that you’ll have a fun time no matter where you end up. Because it’s so vibrant, your lips will instantly become the focus of your look, but since it’s not too dark it still works in combination with heavier eye makeup. Coral Coral lipstick is ideal for those days when you want to express a fiery passion with a cheerful twist! It’s a warm and vibrant color that brings to mind the joys of a vacation to tropical locales. If your skin has naturally golden undertones, it’s even better! It’ll give you the image of a daring, spontaneous woman who’s filled with joie de vivre. You can’t go wrong with coral lipstick, especially for parties or fun dates! While the shade itself feels more fitting in summer, the kind of woman who wears coral lipstick can rock it all-year-round if she so wishes. Bisous (kisses)! There’s a lot you can say with just a small change in lipstick shade. You can go soft and calm with a natural lip color one day, and transform yourself into a passionate diva in a bold lipstick the next. As long as you feel confident in your lipstick, there are no wrong choices!
You’re getting ready for your day. You look in the bathroom mirror at tired eyes and blemishes near your nose. As you apply your cosmetics, your face transforms into a bright-eyed, flawless masterpiece. Using makeup is a fun way to express yourself. When used correctly, it helps enhance your natural beauty and boost your confidence. When misused, it can do the opposite. We will be going over some bad makeup habits that may be causing skin damage and why you need to get rid of them today. Here are some makeup habits you need to stop having Pumping mascara wand Chances are, you or someone you know puts on mascara by pumping the wand back and forth in the tube. It makes sense to think you’re getting an even coat to apply to your lashes. But this is one of the worst makeup habits for applying mascara. The problem with pumping the wand in and out is that you’re also pumping in air. Pumping air into the tube limits the lifespan of your product by making it dry out faster. It can also cause flakiness and clumping, leading to uneven lashes. Instead of pumping the wand, the best way to use mascara is by gently circling the wand inside the tube. Sleeping with makeup on Makeup covers the skin to make it look beautiful and smooth. But sleeping with makeup on can suffocate your skin, causing clogged pores by trapping dirt and oils into your skin. This can lead to dry, dull-looking skin. Skipping moisturizer Moisturizer is one of the most essential products for your skin. It keeps your skin young and fresh and aids in a flawless makeup application. If you don’t have time to apply makeup, make sure you still moisturize. What happens when you skip this step? If it’s not often, it’s fine. But over time, it can lead to dryness, wrinkling, and premature aging. When you apply foundation and other products, your skin can become flakey, causing the makeup to be less effective. If you want a flawless complexion, you can’t skip moisturizer. Not cleaning your brushes Makeup brushes are great at giving a clean and blended makeup application. But people forget that they need to be cleaned. When you don’t clean your brushes, they can breed bacteria, causing issues like dry skin and itchiness. Brushes should be cleaned at least once a week to avoid the buildup of debris and oils. Wearing too much makeup Wearing cosmetics is a great way to feel beautiful, but it’s best done in moderation. It can be easy to put too much on your face or to apply it too often. Your face needs to breathe and needs at least one day a week without makeup. Caking on too much foundation or never letting your skin breathe can lead to skin damage. This includes clogged pores, dry and dull-looking skin. When you notice new blemishes, you’re probably tempted to cover them up with foundation. The best thing you can do is let it breathe for a while and make sure your makeup habits aren’t causing them. Wearing makeup isn’t a bad thing. But one just needs to make sure that it is not becoming a habit of hiding the real skin underneath. - Aakanksha Singh Using expired product Have you ever looked through your makeup bag and noticed a cosmetic that’s a few years old? You might not have used it as much as you thought you would and may be surprised to see it still looks ok. You may be tempted to use it and get your money’s worth. This isn’t a good idea because using makeup products beyond a certain amount of time isn’t always safe. Old products can breed bacteria, causing acne and clogged pores if used on your skin. And if it’s been long enough, it may even be dry and flakey or dull in color. It’s best to simply start over with fresh product. One bad habit often spoils a dozen good ones. - Napoleon Hill What will these bad makeup habits do? Bad beauty habits may seem like no big deal. So you don’t clean your brushes every week, and you sleep with makeup on sometimes. Not a problem, right? The truth is, these makeup habits can lead to serious skin damage. Forgetting once in a while is fine, but more than a few times a week can lead to the problems below. Clogged pores Have you ever had a rough week and then noticed new blemishes on your skin? This is likely the result of clogged pores. Pores are tiny openings where microscopic particles can pass through, allowing products like makeup and lotion to settle in your skin. Because your skin has pores, it needs to be able to breathe. When bad beauty habits occur, it can suffocate them, causing them to clog up. This will often lead to oily skin, acne, and wrinkles. Wrinkles and premature aging When you think of wrinkles and premature aging, it’s easy to assume that as long as you don’t smoke or stay too long in the sun, you’ll be fine. Unfortunately, bad makeup habits can also cause these issues. Sleeping with your makeup on can cause stress to your skin and particles to get trapped in your pores. Permanent skin damage Some bad beauty habits can cause permanent skin damage. The good news is that a lot of skin damage can be reversed with the development of good habits. But take care, not all makeup tips are created equally. Make sure to thoroughly research and understand any new practice before adding it to your daily makeup routine. Shorter lifespan of cosmetics It’s no secret that cosmetics are expensive. Looking your best isn’t cheap, so you don’t want your products going bad before you’ve had a chance to use them. In order to prevent product from drying up or becoming clumpy, it’s important to treat your cosmetics carefully and use them correctly. Here are some makeup tips to help form good habits Micellar water Micellar water is a type of facial cleanser made with water and micelles. Micelles are cleansing molecules that can lift impurities, makeup, and dirt off your face. What makes this product unique is it doesn’t take moisture out of your face, the way a lot of facial cleansers do. It’s also suitable for any skin type, even sensitive skin. To use Micellar Water, simply apply some with a cotton pad, wiping your face like you would with a towelette. The best part? You don’t need to rinse it off. If you find yourself sleeping with your makeup on because you’re too tired to take it off, this product is a great beauty habit to form. Just apply it and fall asleep. You can even use it to clean your makeup brushes. Just put some in a container and twirl your brushes around to remove any makeup and debris. Then, allow it to air dry. A change in bad habits leads to a change in life. - Jenny Craig Keep moisturizer and wipes by your bed Some days you are too exhausted to do a deep clean on your face. We get it, many of us lead demanding lives with long days. But bad beauty habits open doors to negative side effects. If you don’t have the energy to do a full facial cleanse, at least take your makeup off. Do you have a nightstand? If so, keep some moisturizer, and makeup removal wipes there. It’ll only take a minute to wipe the makeup off your face and apply a layer of moisturizer before falling asleep. Your skin will thank you. Rotate cosmetics often It’s not enough to take your makeup off each night so your skin can breathe. It’s important to make sure the products you use are still functional. Expired products can not only cause skin damage by exposing it to bacteria, but it can also look flakey and dull. It’s not worth it. Look up the lifespan of the makeup and skincare products you have to get an idea of what is still good to use. Some products have a two-year shelf life. Others, such as some eye cosmetics, need to be rotated every three months. Make sure you replace your products as needed, and if you find yourself not using it up in time, consider buying a smaller amount. Do you often forget when you bought your products? Next time, get some stickers and label them with the date you purchased the product and how long they’ll be good for. Makeup plays an important role in helping women feel beautiful. Good makeup habits help ensure clear, smooth, and beautiful skin for a long time. What bad makeup habits do you need to change? Share this article, and let us know which one you’re going to change first.