


How to Get Your Makeup to Enhance Your Eye Color
If you’ve ever wondered how to brighten your eyes with your makeup, this article is for you.
We’ll be covering everything from the best eyeshadow for blue eyes to the best eyeliner for green or brown eyes and how to make your eyes pop.
We always like to emphasize that when it comes to makeup, there are no rules. Makeup should be an expression of who you are and how you feel on any given day. That being said, there are certain tips and tricks that will enhance our beautiful natural features.
Your eyes are the window to your soul. They’re often the first thing that anyone will notice about you. So, when it comes to makeup, what can you do to enhance your natural eye color and make it sing?

Don’t match your eyeshadow to your eye color
There’s a common myth circulating the globe that matching your eye color to your makeup is the way to go (i.e., wearing blue eyeshadow with blue eyes, or green eyeliner with green eyes, brown mascara with brown eyes.)
But in fact, the opposite is true when it comes to making your eyes pop. Blue makeup doesn’t enhance your blue eyes; it will make them appear less blue and striking and lead to them disappearing into your face.
The same is true for all eye colors—it’s best to avoid matching your makeup to your eye color if you want to draw attention to your eyes.
But what if you have blue eyes, and you love your blue makeup?
If you can’t bear the thought of completely swapping out your favorite color yet, try switching to a different shade—for example, a pastel blue eyeshadow, a turquoise eyeliner, or a midnight blue mascara.
The color wheel is your friend

You may have briefly checked out a basic version of the color wheel while you were doing an art class at school. But if you haven’t taken a look in awhile, it’s time to get reacquainted with it.
Colors that are side by side on the wheel are known as analogous colors, while colors opposite each other are known as complementary colors.
To make your eyes pop, you want to choose shades that are opposite (or close to opposite) your natural eye color.
However, it’s important to note that most people’s irises are not just one color. There are usually different flecks and hues within that one color.
For example, you might have hazel eyes with hints of honey in them. You might have green eyes with hints of teal or mustard. Take a close look at your eyes in both the daylight and at night.
And when it comes to makeup, the color wheel should be used as a starting guide, but not taken literally. There are so many shades and tones of each color, all of which will show up differently depending on your eye color and skin tone.
The best approach is to try different colors out and see what works for you and what you like most.
Blue eyes

Keep it simple
Blue eyes on their own can be really bright and striking, which is why you want to try and not over-do your makeup. This can leave your eyes and skin looking washed out.
The best approach? Keep it simple. Less is more.
Eyeshadow
The best eyeshadow for blue eyes is anything with an orange base. That means warm copper, gold, apricots, peaches and brown tones. The warmth in these colors will help make your eyes pop and stand out, and highlight any warmer flecks in your eyes.
Purple is another shade that can be quite striking with blue eyes. All shades from lavender through to plum can work to help your eyes appear even bluer and brighter.
Highlight
Subtle highlighting around your eyes can help frame them without the need for eyeliner. It can also prevent them from looking too icy.
Apply a highlighter across your brow bone (just under the brow), as well as the inner corners of your eyes. Opt for a shimmery highlighter rather than a glittery one to keep this look subtle. Neutral and champagne shades will work best.
Liner
Keep your eyeliner minimal and apply it in a thin line. You can also keep your liner to your upper lash line and skip the lower lash line because blue eyes are strong enough to not disappear into your face. This can actually leave them looking bigger and brighter!
Grey eyes

Which color is most prominent in your eyes?
Grey eyes can contain many flecks of color including green, gold, blue and brown tones.
The first step for you is to decide which color is most prominent in your eyes. You can then pick complementary colors accordingly.
Winning colors
To enhance the green in your eyes, choose shades with pink undertones like rich plums and purples. To enhance the blue, go for shades with orange or peach undertones.
Green eyes
Don’t head for red
You’d be right in thinking that red is opposite green on the color wheel. But red is a difficult shade of eyeshadow to pull off. The tones will usually end up making you look sickly. The best eyeshadow for green eyes is within the red spectrum, but opt for reddish browns or plum shades, or even pink.
These tones will help make your green eyes the star of the show.
Soft blush on the cheeks
Add some subtle, soft blush on the apple of your cheeks in a pinky shade. This is a gorgeous feminine look for both work and play.
Liner
The best eyeliner for green eyes is something in a copper or violet shade. But if you prefer a more classic look, black goes with everything and is a staple for creating both simple and more dramatic makeup looks.
A swoosh of liner and a plain, glossy lid is a simple but sexy look.
Let your green eyes do the talking
If you really want your green eyes to stand out, keep everything else natural. Think voluminous lush lashes (try this mascara), glowing cheeks, and a glossy lip. Gorgeous!
Hazel eyes

Green or brown?
Did you know there’s no such thing as pure hazel eyes?
You’re likely to have a mix of tones and flecks in your eyes, ranging from shades of brown to green.
Depending on which color you want to accentuate, you can mix up your makeup accordingly.
To bring out the green, follow what green-eyed girls do and go for red and purple-toned eye makeup. To enhance the brown, opt for blue or copper tones.
Want more drama?
If you’re looking for a bolder look, try a smokey eye, a mix of dark metallic and coppery green tones.
Liner
For a natural look, use brown eyeliner to give your hazel eyes a little more oomph. And for a more radiant, glowing look, try a gold liner.
Brown eyes
Concealer is your friend
Did you know that dark circles can steal attention away from your beautiful, brown eyes?
Before you do anything, find the right concealer for your skin tone and spot it lightly under your eyes as needed. This is a crucial step before you go any further.
Brown eyes suit almost any eye makeup color!
Great news, you can get away with wearing almost any color you like!
If you want to make your brown eyes pop, then contrast is key. Think baby blues, turquoise, and metallic greens. Pink is also a great contrasting color to brown.
But as a general rule, you have free reign here to try out all the colors of the rainbow!
Metallics are a must
Shimmery shades will create a lovely striking contrast against your brown eyes and make them glow. Reserve metallic eyeshadow or liner for those special occasions when you want to make a serious impact.
Don’t overlook the neutrals
Neutrals might seem boring from the outset, but they can create a really sexy, effortless look while also bringing out the natural color of your eyes.
Plus, you can’t ever go wrong with a nude color with brown eyes. Think neutral eye shadows, some brown bronzer, or even a nude lip.
Liner
Classic brown and black eyeliners will always work against your brown eyes. But if you’re looking for an extra-special look, try a blue or purple eyeliner. Most eye colors can’t pull this off, but you can!
Complete the look with mascara for extra volume
Mascara is a must regardless of your eye color. Brown can work well for blue eyes, but black will suit every eye color. Apply some lash primer, one or two coats of classic French mascara, and get ready for your eyes to pop!
Getting your makeup to enhance your eye color is all about knowing which colors suit you and which ones to steer clear of. So get experimenting and try out these tips today!
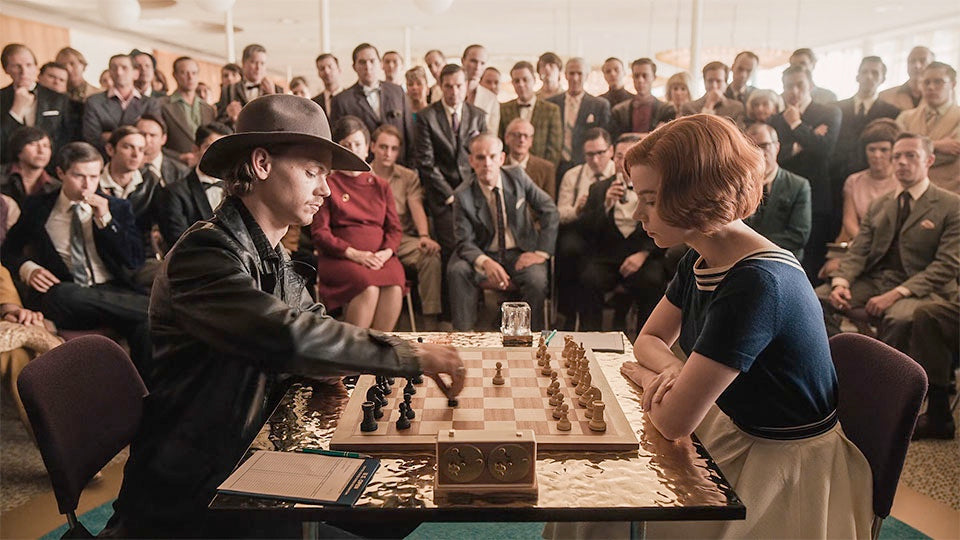
Netflix launched a limited series in October called The Queen’s Gambit, and we are obsessed with the hair, makeup, and fashion! The show is based on Walter Tevis’ novel, and tells the story of chess genius, Beth Harmon (Anya Taylor-Joy). We share her highs, lows, addictions, successes, and everything in between. But if there’s one thing we can't get enough of it’s her impeccable ‘50s & ‘60s inspired style. Beth finds herself in a field dominated by men wearing classic white shirts paired with thick-framed glasses. Suddenly, she’s a style icon, managing to seamlessly blend the starkly contrasting chess and fashion worlds together. Here are some of the most iconic looks from the show. Classic Makeup Beth Harmon’s makeup follows a natural evolution throughout the show, as she grows up and finds her own unique sense of style. Her signature look is usually ‘60s inspired with perfect winged eyeliner and a bold lip. We all know how difficult it is to get those wings right, which is why Beth’s makeup has us mesmerized. There’s only one moment where she veers away from this classic look and channels a wild child style. Insider secret: The Queen's Gambit makeup artists had to go against their natural urges and apply her makeup badly on purpose for these scenes! Get Beth’s Classic ‘60s Look: Use a black liquid eyeliner to perfect those wings (we’ve got a step-by-step guide for you below). Apply some classic French mascara for a natural, feminine look. Try our long-lasting matte lipstick in your favorite shade to complete the look. Bold Bangs A younger Beth models some of the boldest cropped bangs we’ve ever seen. A little harsh on the eye, but very common for children in orphanages at the time. Every child would get the same cut because it was practical and easy to manage. Although the look is severe, there’s a soft charm to it that draws you in. While it’s not for everybody, this hairstyle combined with the fiery red color creates a real statement look. Tea-length Dress In the show, the first item of clothing Beth is able to buy with her own money is a checked, tea-length dress. It’s full-skirted, totally retro, and oh-so feminine. If you’re looking for one of these dresses, the best place to head is your local vintage shop. You can pair it over a blouse like Beth does, or wear it on its own and show a little more skin. Throw a modern sweater or jacket on top for an eclectic look. Embrace Straight Lines The ‘50s were all about the hourglass figure, with Christian Dior popularizing the “New Look” for women. But the ‘60s saw a backlash with anti-hourglass silhouettes being most desired. Think straight-cut dresses, jackets, and sweaters. While it's not inherently feminine, this silhouette can be oh-so-flattering. Beth shows us this with her simple-yet-stylish mini dresses. Queen's Gambit Makeup: Perfect Winged Eyeliner If there’s one thing Beth is famous for, it’s wearing winged eyeliner throughout the Queen's Gambit. But how do you get this look? First thing’s first, you’ll need a black liquid eyeliner with a fine point. If you’re new to this, use the dot to dot approach by marking out the line of the wing you want to create. The goal here is to go upwards and outwards. Check you’re happy with the symmetry on both eyes, then lightly connect the dots. Leave it to dry before adding voluminous mascara to your lashes for a glamorous ‘60s look. And if you really struggle to keep a steady hand, you can try a winged eyeliner stamp to help you. Chessboard Chic Taking inspiration from Edie Sedgwick, Jean Seberg, and Pierre Cardin, Beth dazzles in outfits filled with striking geometric patterns, subtly mirroring the chessboard. A whopping 12 of her on-screen outfits feature geometric print! A simple, sleeveless checkered dress and square printed shirt were standout looks. Beth’s style is fitting for the time, yet filled with her desire to break out of the box and find her own way. To recreate this look, choose one item of clothing to work the geometric pattern in, and keep everything else simple. You don’t want to look like a walking chessboard! Monochrome Magic As a further nod to her deep love of chess, we see Beth in a multitude of monochrome outfits. Her black and white shift dress was perhaps the most striking black and white outfit of all. So elegant and sophisticated, but with a cheeky element of fun thrown in. Black and white are timeless and will never go out of style. You can go all black, all white, or mix and match as you like! Luxe Loungewear Even when she’s relaxing on the sofa at home, Anya Taylor-Joy’s character looks effortlessly chic. Think pale blue cashmere PJs, a dusty pink cardigan, soft cozy sweaters, and plain black slacks. Each piece can be worked into her going out wardrobe, taking her from night to day. To get Beth’s luxe lounge look, go for pieces that are multi-functional. Think practical, comfy, and pretty. If only we could look this good vegging out on the sofa! Vintage Accessories Aside from geo patterns and monochrome colors, you can count on Beth to be rocking a Peter Pan collar or a silk scarf. The round collar features everywhere: from dresses all the way to a buttoned vest. It’s a lovely feminine style with a vintage nod. When it comes to scarves, Beth often ties them around her head, but they work just as well around the neck to brighten up any outfit. The Final Episode: Classic 1950s And '60s Makeup We couldn’t do a roundup of the Queen's Gambit makeup and fashion without mentioning Beth’s iconic all-white look in the final episode. This is the most confident and feminine Beth looks throughout the entire season—proving that you don’t have to choose one or the other. Her hair is sleek to create a more mature, sophisticated look, and her classic ‘60s makeup is immaculate. Her red lips look striking against her white coat and hat, and she looks super sexy. We didn’t want the show to end. But if it had to, we’re glad Beth went out looking like this. All Images are property of Netflix
Perfect winged liner is one of the most challenging makeup techniques to master. At first swipe, you end up with an overly subtle winged eyeliner, so you decide to add just a touch more, and next thing you know, you’ve overdone it… Don’t even get us started on getting both eyes to match! The only thing that might be tougher than winged eye makeup is a vivid red pout, so it’s funny how one of our favorite go-to looks in French beauty is a combination of these two. Through years of practice, we've refined our skills and uncovered some of the best winged eyeliner hacks that make achieving that subtle wing a little easier. Today, we’ll be sharing all of our tips with you! What kind of winged eyeliner look do you want? Are you aiming for a natural winged eyeliner look, or would you prefer a dramatic cat eye? Winged eyeliner comes at a few different intensity levels, and the angle of your wing will have a big impact on your look. These days, the sharp “fox” winged eyeliner look has become especially popular, but we’re still enamored with the subtle winged eyeliner of the ‘40s and the sultry winged eye makeup of the ‘70s. While you do need to decide on the kind of look you want, our tips will help you achieve the perfect winged eyeliner every time. Winged eyeliner for different eye shapes Taking your eye shape into account will help you figure out how to master the wing since when you draw on a liquid liner, you’re effectively changing the borders of your eye. The more sharply angled your eyeliner, the more upturned your eyes will look, while if you go horizontal, they’ll look a little sleepy and sultry. As for the lash line, a rounded shape will make the eyes look doll-like, while progressing from thin to thick towards the outer corner will make the eyes look almond-shaped. What about the inner corner? In classic French beauty, we like to stop the eyeliner before the inner corner, and sometimes even at the eye’s center; this opens the eyes and gives the face a very fresh look. However, in recent years, it’s become trendy to aim for a sultry look by bringing the eyeliner all the way down to the inner corner in its own little wing. Feel free to experiment and see what style you like best! Choose the right eyeliner Liquid and gel eyeliners are the ideal choice for a winged look, but some are easier to work with than others. Gels usually come in a pot, so they require a separate brush, which can be inconvenient at times. As for liquids, many come with ultra-thin brush applicators that are difficult to control. Felt-tipped pens, like the Feutre Fin, are ideal. With a tapered, sturdy felt tip, a pen eyeliner offers a precise wing but can still cover a lot of space when necessary. Keep your distance from the mirror This is one of our most useful winged eyeliner tips, so read closely. Instead of holding your mirror close to the face as you draw on your eyeliner, take a step back. This will allow you to see both of your eyes simultaneously, which is essential for achieving perfectly symmetrical eyeliner wings. Otherwise, working too close to the mirror can easily result in two gorgeous eyeliner wings that look nothing like the other – giving you a lopsided look. Steps to a perfect wing Now, for the actual application! If you start with the hard part first, the rest of your winged eye makeup will be a breeze. It just so happens that the most challenging part of winged eyeliner is the wing itself. Start with the eye you usually struggle with, and draw the lower line of the wing by following your lower lash line. Do the same thing on your other eye while checking for symmetry in the mirror. Then, draw on each wing’s top line, creating a little triangle at the outer corner. Once again, do the same on the other eye and check that everything lines up. If your wing is a little more dramatic, you may need to fill it in a little as well. Small lines from outer corner to inner corner Now it’s time to draw your liner over the lash line. To avoid gaps between the liner and your lash line, pull your lid upwards (gently!) as you apply. Then, working from the outer corner inwards, draw the eyeliner on in short strokes. Don’t worry too much about achieving a perfect line yet — once you let go of your lid, you’ll be surprised to see how even and delicate your winged eyeliner looks. You can then correct or thicken up the line after you have that base layer down. Keep the eye open to fit a hooded lid One common struggle many makeup lovers face is how to apply winged eyeliner to hooded eyes. The secret is to draw the top line of your eyeliner wing while your eyes are totally open so that your eyeliner sort of “skips” over the crease. It’ll look like there’s a little step or divet in your eyeliner when your eyes are closed, but when they’re open, it will look incredibly flattering. No more winging it Using liquid eyeliner might seem daunting at first, but with our winged eyeliner hacks and suggestions, we know that not only will you master the wing, but you’ll also refine it to suit your flare.
Smokey eye makeup is up there with the most popular makeup looks of all time. One quick search for a smokey eye tutorial will field millions of how-tos in seconds. And for good reason. A smokey eye is sexy, sophisticated and the perfect makeup look for any party or celebration. And although it may seem complicated, when you know what to do, you’ll find it’s pretty simple. That’s why we’ve put together this simple guide on how to get the sexiest smokey eye step by step. It should take around ten to fifteen minutes to complete, but a little longer if you’re a newbie. Remember, the more you practice your technique, the better the result. So what are we waiting for? Let’s dive in. Here’s what you’ll need to get started: Eyeshadow base (primer) Dark-colored kohl eyeliner Lighter eyeshadow (pearl or creams work well) Darker eyeshadow (see color recommendations below) Eyeshadow brush (a couple if possible, but you can wash between uses) Eyelash curler Mascara Which color should I go for? If you’re after a deep smokey eye then opt for a rich, matter color in black, brown, or deep gray. These colors will create an edgier look and make a bolder statement. If you’re looking for a more natural smokey eye, choose something less harsh, like a plum color. For a jeweled tone, purples, blues, and greens are striking. You can also use a shimmery eyeshadow if you like, for extra sparkle. Don’t do any other makeup before your smokey eye You might think that applying your foundation and concealer before working on your eyes is the natural thing to do. But the pros apply eye makeup first. Why? Because no matter how careful you are, there are bound to be flecks of eyeshadow powder and mascara that fall down your face. If you’ve already done the rest of your makeup, then you’ll have to touch it up. It’s much easier to fix mistakes like this without a full face of makeup. So no matter how much you want to apply other makeup first, don’t do it! Trust us on this one. Prime your eyelids Not everyone does, but if you have shiny lids, priming your eyelids first is a must. Without it, your eye makeup is bound to melt and smudge all over the place. And nobody wants that. Primer will create a solid foundation for any layers of eyeshadow you apply on top and will help you build color that lasts. Plus, it will prevent it from creasing. Use a brush or cotton pad to sweep it over both lids. Leave it to dry before starting your smokey eye makeup. Begin with a kohl eyeliner Start with a kohl eyeliner as a base. This is what will anchor your eyeshadow, and keep it on all night. We recommend picking the same color as the eyeshadow you’re using, but feel free to mix things up and experiment with color combos. Concentrate the eyeliner on the inner and outer corners of your upper lid, leaving the space in the middle bare. Use a brush to blend this across your upper lash line. This is how you begin creating that smoldering, sexy look, and it stops it from looking too intense. Next, use the same eyeliner on your lower lash line, blending it out with the same brush as before. Apply a light base color Every smokey eye look tutorial will recommend contrasting a light eyeshadow with a dark one. This adds to the smokiness. Using a clean brush (or washing the previous one), sweep the lighter color across the eyelid, following along to the brow bone. This is how you create the shadow for your smokey eye. Apply dark eyeshadow Next, grab your chosen darker eyeshadow color, and apply to the eyelid with a clean brush. Use enough to coat the color on your lid, but make sure you stop below the brow bone this time. Once you’re done, blend the color into your upper lash line (where the eyeliner is) as well as into the line between the dark and light shadow. Use a clean brush to do this, working small circular movements. The most important thing when creating a smokey eye makeup look is to avoid harsh lines, and to blend... and blend again. When you think you’re done, take a step back and check both eyes for symmetry. You’re looking for an even blend on both eyes. Curl the eyelashes The next step is to use an eyelash curler to give your lashes a sexy curve. Heat it with a hairdryer for ten seconds, and test it on the back of your hand before putting it near your face. Hold the curler for 10 seconds on each eye. Complete the look with a swoosh of mascara To complete your smokey eye, finish with as much or as little mascara as you like. If you’re going for a bolder look, amp up the volume here. If you’re going for a natural smokey eye, then stick to one or two layers. We love our Classic French Mascara for voluminous lashes in just one coat. Start at the root of your upper lashes, and wiggle up to build length and volume. You can apply mascara to your lower lashes too, but keep it to a minimum to avoid a spidery look. And that is your complete smokey eye look tutorial! Remember: Let your smokey eye makeup stand out Even if you’ve opted for a natural smokey eye, it’s still a strong look. And you want it to stand out. So keep the rest of your makeup to a minimum, and stick to neutral colors. A little bronzer, a neutral blush, and a nude lip will complete the look, but your eyes will remain the star of the show. And that’s it! We now pronounce you ready to create the sexiest smokey eye look ever.