


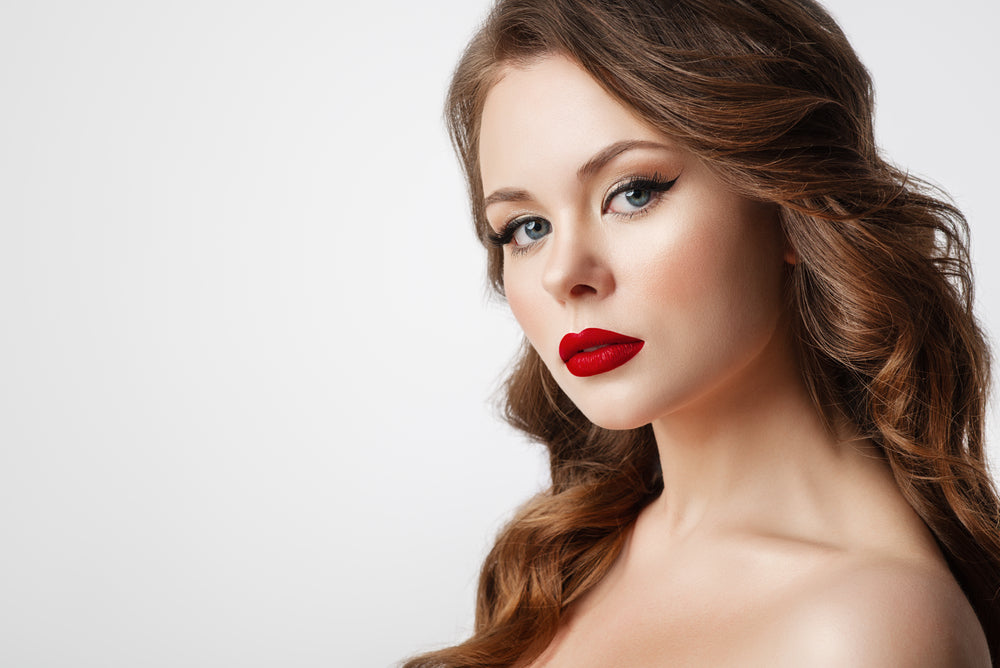
Step-by-Step Winged Eyeliner
Perfect winged liner is one of the most challenging makeup techniques to master. At first swipe, you end up with an overly subtle winged eyeliner, so you decide to add just a touch more, and next thing you know, you’ve overdone it…
Don’t even get us started on getting both eyes to match!
The only thing that might be tougher than winged eye makeup is a vivid red pout, so it’s funny how one of our favorite go-to looks in French beauty is a combination of these two.
Through years of practice, we've refined our skills and uncovered some of the best winged eyeliner hacks that make achieving that subtle wing a little easier. Today, we’ll be sharing all of our tips with you!
What kind of winged eyeliner look do you want?
 Are you aiming for a natural winged eyeliner look, or would you prefer a dramatic cat eye? Winged eyeliner comes at a few different intensity levels, and the angle of your wing will have a big impact on your look.
These days, the sharp “fox” winged eyeliner look has become especially popular, but we’re still enamored with the subtle winged eyeliner of the ‘40s and the sultry winged eye makeup of the ‘70s.
While you do need to decide on the kind of look you want, our tips will help you achieve the perfect winged eyeliner every time.
Winged eyeliner for different eye shapes
 Taking your eye shape into account will help you figure out how to master the wing since when you draw on a liquid liner, you’re effectively changing the borders of your eye.
The more sharply angled your eyeliner, the more upturned your eyes will look, while if you go horizontal, they’ll look a little sleepy and sultry.
As for the lash line, a rounded shape will make the eyes look doll-like, while progressing from thin to thick towards the outer corner will make the eyes look almond-shaped.
What about the inner corner?
 In classic French beauty, we like to stop the eyeliner before the inner corner, and sometimes even at the eye’s center; this opens the eyes and gives the face a very fresh look.
However, in recent years, it’s become trendy to aim for a sultry look by bringing the eyeliner all the way down to the inner corner in its own little wing. Feel free to experiment and see what style you like best!
Choose the right eyeliner
 Liquid and gel eyeliners are the ideal choice for a winged look, but some are easier to work with than others. Gels usually come in a pot, so they require a separate brush, which can be inconvenient at times.
As for liquids, many come with ultra-thin brush applicators that are difficult to control. Felt-tipped pens, like the Feutre Fin, are ideal. With a tapered, sturdy felt tip, a pen eyeliner offers a precise wing but can still cover a lot of space when necessary.
Keep your distance from the mirror
 This is one of our most useful winged eyeliner tips, so read closely.
Instead of holding your mirror close to the face as you draw on your eyeliner, take a step back. This will allow you to see both of your eyes simultaneously, which is essential for achieving perfectly symmetrical eyeliner wings.
Otherwise, working too close to the mirror can easily result in two gorgeous eyeliner wings that look nothing like the other – giving you a lopsided look.
Steps to a perfect wing
 Now, for the actual application! If you start with the hard part first, the rest of your winged eye makeup will be a breeze. It just so happens that the most challenging part of winged eyeliner is the wing itself.
- Start with the eye you usually struggle with, and draw the lower line of the wing by following your lower lash line.
- Do the same thing on your other eye while checking for symmetry in the mirror.
- Then, draw on each wing’s top line, creating a little triangle at the outer corner.
- Once again, do the same on the other eye and check that everything lines up.
- If your wing is a little more dramatic, you may need to fill it in a little as well.
Small lines from outer corner to inner corner
 Now it’s time to draw your liner over the lash line. To avoid gaps between the liner and your lash line, pull your lid upwards (gently!) as you apply. Then, working from the outer corner inwards, draw the eyeliner on in short strokes.
Don’t worry too much about achieving a perfect line yet — once you let go of your lid, you’ll be surprised to see how even and delicate your winged eyeliner looks. You can then correct or thicken up the line after you have that base layer down.
Keep the eye open to fit a hooded lid

One common struggle many makeup lovers face is how to apply winged eyeliner to hooded eyes. The secret is to draw the top line of your eyeliner wing while your eyes are totally open so that your eyeliner sort of “skips” over the crease. It’ll look like there’s a little step or divet in your eyeliner when your eyes are closed, but when they’re open, it will look incredibly flattering.
No more winging it
 Using liquid eyeliner might seem daunting at first, but with our winged eyeliner hacks and suggestions, we know that not only will you master the wing, but you’ll also refine it to suit your flare.

If you haven’t yet caught a glimpse of Netflix’s hit show, Emily In Paris, where have you been?! We are obsessed with the French-girl beauty that storms our screens as Emily (British-American actress Lily Collins) settles into Parisian living. Actress Lily Collins steals the show with her low-key, simple yet chic beauty and fashion looks. There isn’t a scene where we’re not taking notes. Think fresh, clear skin, bold brows, voluminous lashes, and understated lips. Less is definitely more In France, and we’re loving it! But there’s one thing we want to know more about, and that’s Lily’s real-life beauty routine. How does she keep her skin looking so immaculate? What are her makeup must-haves? And how does she keep her beautiful brows in check? Don’t worry, we’re bringing you Lily Collins’ beauty routine in full detail here, no filter. This is what Lily Collins’ everyday beauty routine looks like. Morning skincare What does Lily’s AM skincare routine look like? Well, you’ll be surprised how low-key it is. She begins with a splash of cold water on her face to wake herself up. To kick-start her skincare routine, she uses a facial wash, toner gel, and moisturizing cream. Next up? Lily always applies a layer of sunscreen (her go-to is Kiehl’s), whether it’s summer or winter. We recommend at least an SPF 20 if possible. Look for a light-weight, non-greasy sunscreen that feels like a second skin. Lily has spoken out about embracing her natural, ivory skin, so you won’t find any tanning products in her house! She also loves rubbing some mint or spearmint oil on her temples and the back of her neck to wake herself up and feel invigorated inside and out. One of her favorites is Peppermint Halo by Saje, which comes in a handy roller ball. And, did you know Lily is obsessed with hand cream? Yes! You’ll find her re-applying it throughout the day to keep her skin feeling soft and silky, just the way her Grandma used to do. Her favorite scent? Rose wins out every time—Crabtree & Evelyn have a rosewater one she is crushing on. The perfect base Lily Collins is famous for channeling that French-girl beauty by keeping her makeup minimal and natural all the time, apart from on special occasions. When she’s at home, she wears very little; her motto being “the less there is on you, the less there is to go wrong!” But what about when she is wearing makeup? Lily loves to go for a foundation that is light enough to allow her natural freckles to shine through but just enough to give a nice base. She steers clear of heavy, coated products to avoid her pores getting clogged. For days when she wants something a little different, she mixes a small drop of light foundation with her favorite serum, then dabs it into her forehead, chin, and cheeks. To blend, she uses a sponge, then tops with a powder to set it, and a bit of blush for contouring. It’s all about the brows The next step on Lily Collins’ beauty routine is tending to her bold and beautiful brows. The question on all of our minds while watching Emily In Paris has been, what’s the secret to her brow game? Tell us all Lily! When asked what her favorite part of her beauty regimen is, she aptly said “It’s all about the brows.” She swipes a highlighter over her eyelid and under the brow to make her brows pop even more. She brushes her eyebrows up and over to slightly tame them. And that is IT. Seriously. On the odd occasion when they need a little more taming, she uses some mascara to lend a helping hand. To draw extra attention to her eyes, she applies a few flicks of liquid liner at the outer edges. She then adds a coat of volumizing mascara to bring fullness and life to her lush lashes. Nothing says French beauty quite like fluttery lashes does. If there’s one thing every French woman includes in her beauty routine, it’s a swoosh of black mascara. Lush lips When it comes to her lips, Lily begins by gently exfoliating them with a delicious, tropical coconut scrub. Once her lips are prepped, she coats them with lip balm–and you’ll find her reapplying it throughout the day to keep those lips looking lush. For an everyday look, Lily tops her lip salve with a swipe of nude lipstick and her favorite gloss. But what about those red-carpet occasions? Lily has perfected the shades that compliment her pale skin and dark hair and opts for softened red lipstick shades and deep plums. If you’re looking for some lipstick inspo, check out our long-lasting matte lipstick, which is available in four fabulous color combos. There’s guaranteed to be a shade that was made for you. Fabulous fragrance When it comes to fragrance, there are a few favorites that Lily loves. Rose makes the cut once again, then bergamot and oud. She’s usually drawn to deeper scents rather than feminine ones. But if she had to pick a scent of choice? La Vie Est Belle. That means “life is beautiful” in French. The scent swoops her back to her Paris-days and has her longing to be reunited with the most romantic city in the world. We can’t wait for that either, Lily! Messy hair, don’t care French women are loved (and envied) worldwide for perfecting that I-just-woke-up-like-this hair. It’s chic, but it’s not perfect. Think wind-swept runway romance. How do they do it?! Well, Lily seems to have perfected that Paris-hair, and guess what her secret is? She lets her hair do whatever it wants. Really. Her hair goes through a lot as an actress, constantly being colored and curled while on set. So when she’s off-duty, she keeps things super simple. She loves Kérastase for repairing her hair, and often goes for a volumizing hair gel when she desires some extra volume. She’s also a big fan of dry shampoo (could this woman be any cooler?). Oribe hair sprays are her favorite when she hasn’t washed her hair in a few days and needs a quick pick-me-up. Evening rituals Lily’s evening beauty routine echoes her morning ritual. She’ll shower, get cozy on the sofa, and remove all her makeup using face wipes. Later, she rinses her face with the same gel she used in the morning and applies some face cream. When her skin feels extra dry, she opts for a quick face mask and rubs natural coconut oil into her body. Then it’s off to bed for some much-needed beauty sleep.
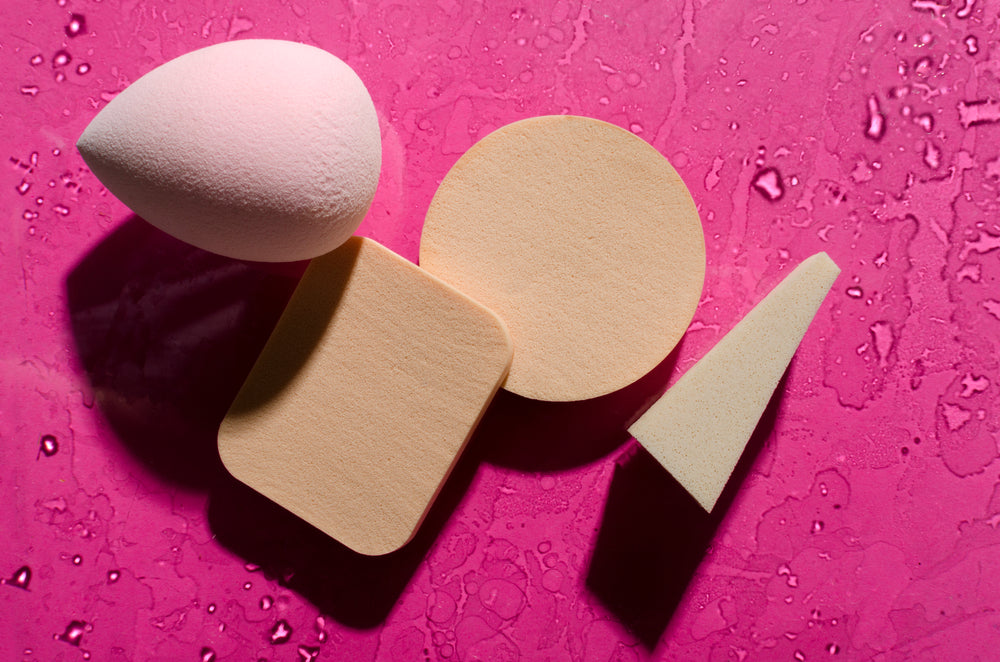
When the Beauty Blender was first released, it shook the makeup world from top to bottom. Before it came around, we were using flat brushes and dry, triangle-shaped sponges. These tools worked, but applying foundation would take ages. Nowadays, these egg-shaped makeup blenders are the ideal tool for applying a natural-looking layer of foundation or blending out concealer. Reusable makeup sponges give the skin a natural finish, and they’re oh so simple to use. There are a few key tricks to making a Beauty Blender work, which we’ll explain in this post. The most important amongst them? You have to use your makeup sponge wet. Keep reading to learn why! Why should you wet makeup sponges? Using a wet makeup sponge makes a major difference, so here are the reasons why we recommend it so strongly. Less product waste First of all, using a damp makeup sponge can save you a lot of time and money in the long term, because it wastes less product. When your sponge is dry, it absorbs a ton of foundation right into its center. If you’ve ever found yourself dispensing more and more foundation, but getting no coverage, that’s the reason why. On the other hand, when the sponge is damp, the water takes up all of the space in the sponge, and there’s no room for the foundation to soak in. Instead, it stays on the surface, so you can stipple it over your skin with no product waste. Flawless finish The second reason to use a damp makeup sponge is that it makes your foundation or concealer look so much better. Some of the water in the sponge infuses with the foundation, which gives the skin a more luminous and healthy finish. Because the sponge is expanded, it also leaves less of an imprint on the skin, which leads to a much smoother and more blended finish. How to use a wet makeup sponge Whether you’re using a wet makeup sponge to apply or blend your foundation, here’s the most fool-proof way to prep and then use it. First, run the tap and place your reusable makeup sponge under the stream. Let the sponge get saturated with water, and then squeeze it a few times. As the sponge takes in the water, it’ll expand to twice or triple its original size. Turn off the tap, and squeeze the sponge to remove excess water. It should be damp rather than soaking wet. Then, you can use the sponge to either apply or blend your foundation. Applying your foundation directly with the sponge will give a more sheer application. If you like full coverage, apply your foundation with a brush or fingers, and then use the sponge to blend it out. Whether you’re blending or applying, the main trick is to bounce the sponge over your skin. The bouncing motion helps the foundation glide over pores and it blurs away any brush streaks. Use the tip of the sponge for blending out or applying concealer under the eyes or along the side of the nose. Stick to the same bouncing motions as you apply it to those smaller areas. Once your foundation is perfected, you can finish off the rest of your makeup! More tips for using a makeup blender Using a Beauty Blender the classic way is great, but we have a few more hacks that will allow you to get the most out of your reusable makeup sponge! If you don’t like getting your hands dirty, you can use your Beauty Blender to apply moisturizer and primer before you do your makeup. If your skin is especially dehydrated, you can saturate your Beauty Blender with a moisturizing toner, which will hydrate the skin even more dramatically. For days when you really need your makeup to last, saturate your reusable makeup sponge with a setting spray, instead. It’ll help lock your foundation in place as you apply it. If your skin is oily or you’d like to waterproof your makeup, you can use a damp makeup blender to press translucent powder into your skin to set your base. While this technique can make dry skin look drier, it works well for those with oily skin, helping to make your foundation incredibly budge-proof. If you make any mistakes winging out your eyeliner or you want your eye makeup to have a sharper line, put a bit of foundation along the side of the pointy end of your sponge. Then use it to clean up the lines along the outer corner of the eye. A Beauty Blender is perfect for applying and blending out cream blush, highlighter, or contour! Use the pointy end to add those contour lines, or blend out your blush with the rounded end for a very natural flush of color. Don’t forget to wash it Finally, once you finish your makeup, always remember to wash your sponge with soap and water! Otherwise, Beauty Blenders can harbor bacteria if they’re left dirty or damp. To clean your sponge, hold it under the running tap, and then add some soap. Squeeze it a few times so it foams up well, and finally, rinse it clean. Squeeze it to get as much of the water out, and then place it somewhere clean and safe to air dry. This will keep your reusable makeup sponge in top shape for up to 6 months. Flawless foundation every time Considering how simple of a trick it is, using a wet makeup sponge has an amazing impact! There is no better way to guarantee a seamless and natural-looking foundation application. Give this trick a try to stop wasting foundation and to perfect your base.
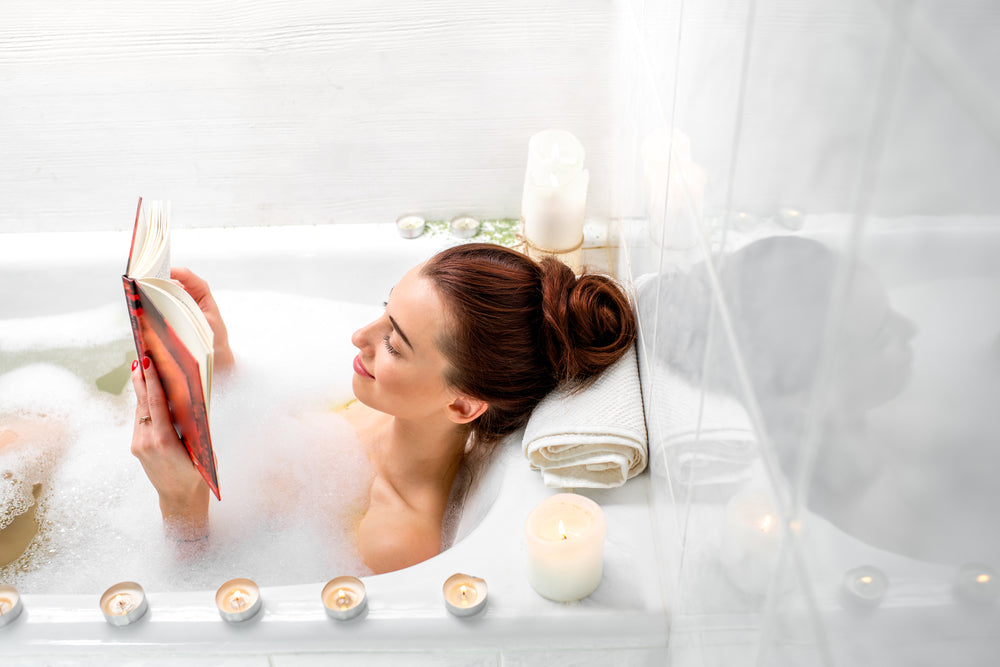
The best way to show yourself love is to take time out of your day and do something that is wholly and completely for you. A bath certainly counts! It feels divine as it relaxes the muscles and helps you unwind. It’s also a wonderful chance to pamper yourself with skin treatments, bath salts, and scented oils. We’ve put together this guide to help you learn how to take a luxurious bath like no other. We’ll help you set up a relaxing bath routine, with tips on how to run the perfect bath temperature and advice as to what kind of accessories you’ll need to have a great time. Even if you don’t have a bath, give this a read, ‘cause we cap things off with some relaxing shower tips. Dive in! Set the scene Ambiance is everything, darling. Turn your bathroom into an environment where you can unwind. Instead of harsh electric light, opt for some scented candles, and queue up the dreamiest playlist. Any music or soundscape that helps you relax will do; you can try tree.fm’s forest soundscapes, some guided meditation, or even a spa playlist on Spotify. Perfect the temperature The question of how to run the perfect bath temperature is a tough one. On the one hand, you want the water to stay hot for as long as possible, but on the other hand, you still want it to be pleasant right from the start. Filling up the bathtub can take a while, so turn on the tap early. Twist the tap to a position where it’s just a little hotter than you would normally shower or bathe in, but not cranked all the way up. There is some debate as to what the ideal bath temperature is, but most of us don’t keep thermometers on hand to check the precise temperature, anyway. You’ll know you’ve landed on the correct temperature when you can dip your foot in the water and leave it in for 5 seconds without any issues. Waterproof your entertainment A book or a TV-show can be pleasant bathtub companions, but bringing paper or tech devices into the water with you requires some planning. You can choose a cheap paperback, so it won’t be a great loss if it falls in, or simply waterproof your devices. For the best luxury bubble baths, consider buying a waterproof case or even a waterproof device. Consider a beverage The next little treat for your relaxing bath routine is a beverage. Wine is the classic choice for a luxury bath, but don’t feel constrained. Tea, hot chocolate, and even juice are equally suitable companions. If you do opt for an alcoholic beverage, make sure to also have some water on hand. It’s easy to get dehydrated or overheated in the bath, and alcohol will compound that, so staying hydrated is essential. Start with a pre-bath rinse Before getting into the bath, rinse yourself off, especially if you’ve had a long and grueling day. If you have both a shower and a bath, you can do this while the bath is filling up! Otherwise, you can do this before starting to fill up the tub. Keep the water lukewarm, and soap yourself up quickly—there’s no need to go overboard. A bath pillow is essential Unfortunately, even the most luxurious bathtubs are designed out of rock-hard porcelain, so resting your head on the lip of the tub isn’t the most comfortable. You can fold-up a small towel to cushion your head as you lie back, but if you really want to take your bathing experience to the next level, purchase a dedicated waterproof bath pillow. Consider your bath additives There are a few lovely options for additives that you can add to your bathtub. Luxury bubble baths can be a lot of fun, but the detergent-laden blends aren’t great for the skin, so here’s what we recommend. Natural bath bombs are amazing because they fizz, sparkle, and smell gorgeous. It’s even better if you learn how to make your own! Epsom salts can be a simple, affordable addition that’ll help your muscles unwind. To nourish your skin, pour in some bath oil or even just a spoonful of coconut oil. Just remember that oil will make the bathtub a little slippery when it’s time to get out. Finally, a few drops of your favorite essential oil will turn the entire bath into an excellent aromatherapy experience. Be sure to always be mindful of what oils you allow to come in contact with your skin and always test on a small area of your body before putting anything in the tub. Enjoy a skin treatment How can you take a luxurious bath without adding in some face treatments? We don’t think it’s possible. Steamy bath time is ideal for face treatments! You’ll have time to lie back while the added steam helps nourishing ingredients penetrate into the skin. Try a purifying clay mask, apply a Korean sheet mask, or go with your favorite facial skincare treatment! Guarantee a cozy finish Eventually, even if you’ve run the perfect bath temperature or put on your favorite soundtrack, you’ll still need to get out of the bathtub. Don’t let the luxurious experience end in disappointment with a scratchy, threadbare towel. Instead, prepare your fluffiest towel or bathrobe well in advance, so you can feel pampered right up until the end. What if you don’t have a bathtub? Unfortunately, not every home is fitted with a bathtub, especially if you live in a big city apartment. We’ve gathered some tips so you can have a relaxing shower, instead. While it might be hard to enjoy candles through the shower curtain, you can still dim the lights for a calming environment. Waterproof Bluetooth speakers will allow you to enjoy some music despite the noise of the showerhead. It’s harder to relax when you’re standing upright, so consider placing a plastic stool in your shower, so you can sit back under the warm spray. While bath oils or salts won’t work in the shower, you can pamper your skin with an exfoliating salt and oil scrub. Placing a bath bomb by the shower drain will create just as dramatic an aromatherapy experience as it does in the bath. As the warm water melts it away, it will release the fragrance, enveloping you in relaxation. And off to bed After a relaxing shower or a luxury bubble bath, you’ll be ready for bed! The bath routine is designed to promote calmness and relaxation. It’s ideal to save the pampering for the end of the day when you need to unwind. By the time your bath is over, you’ll want nothing more than to sleep deeply and soundly. Bonne nuit!