


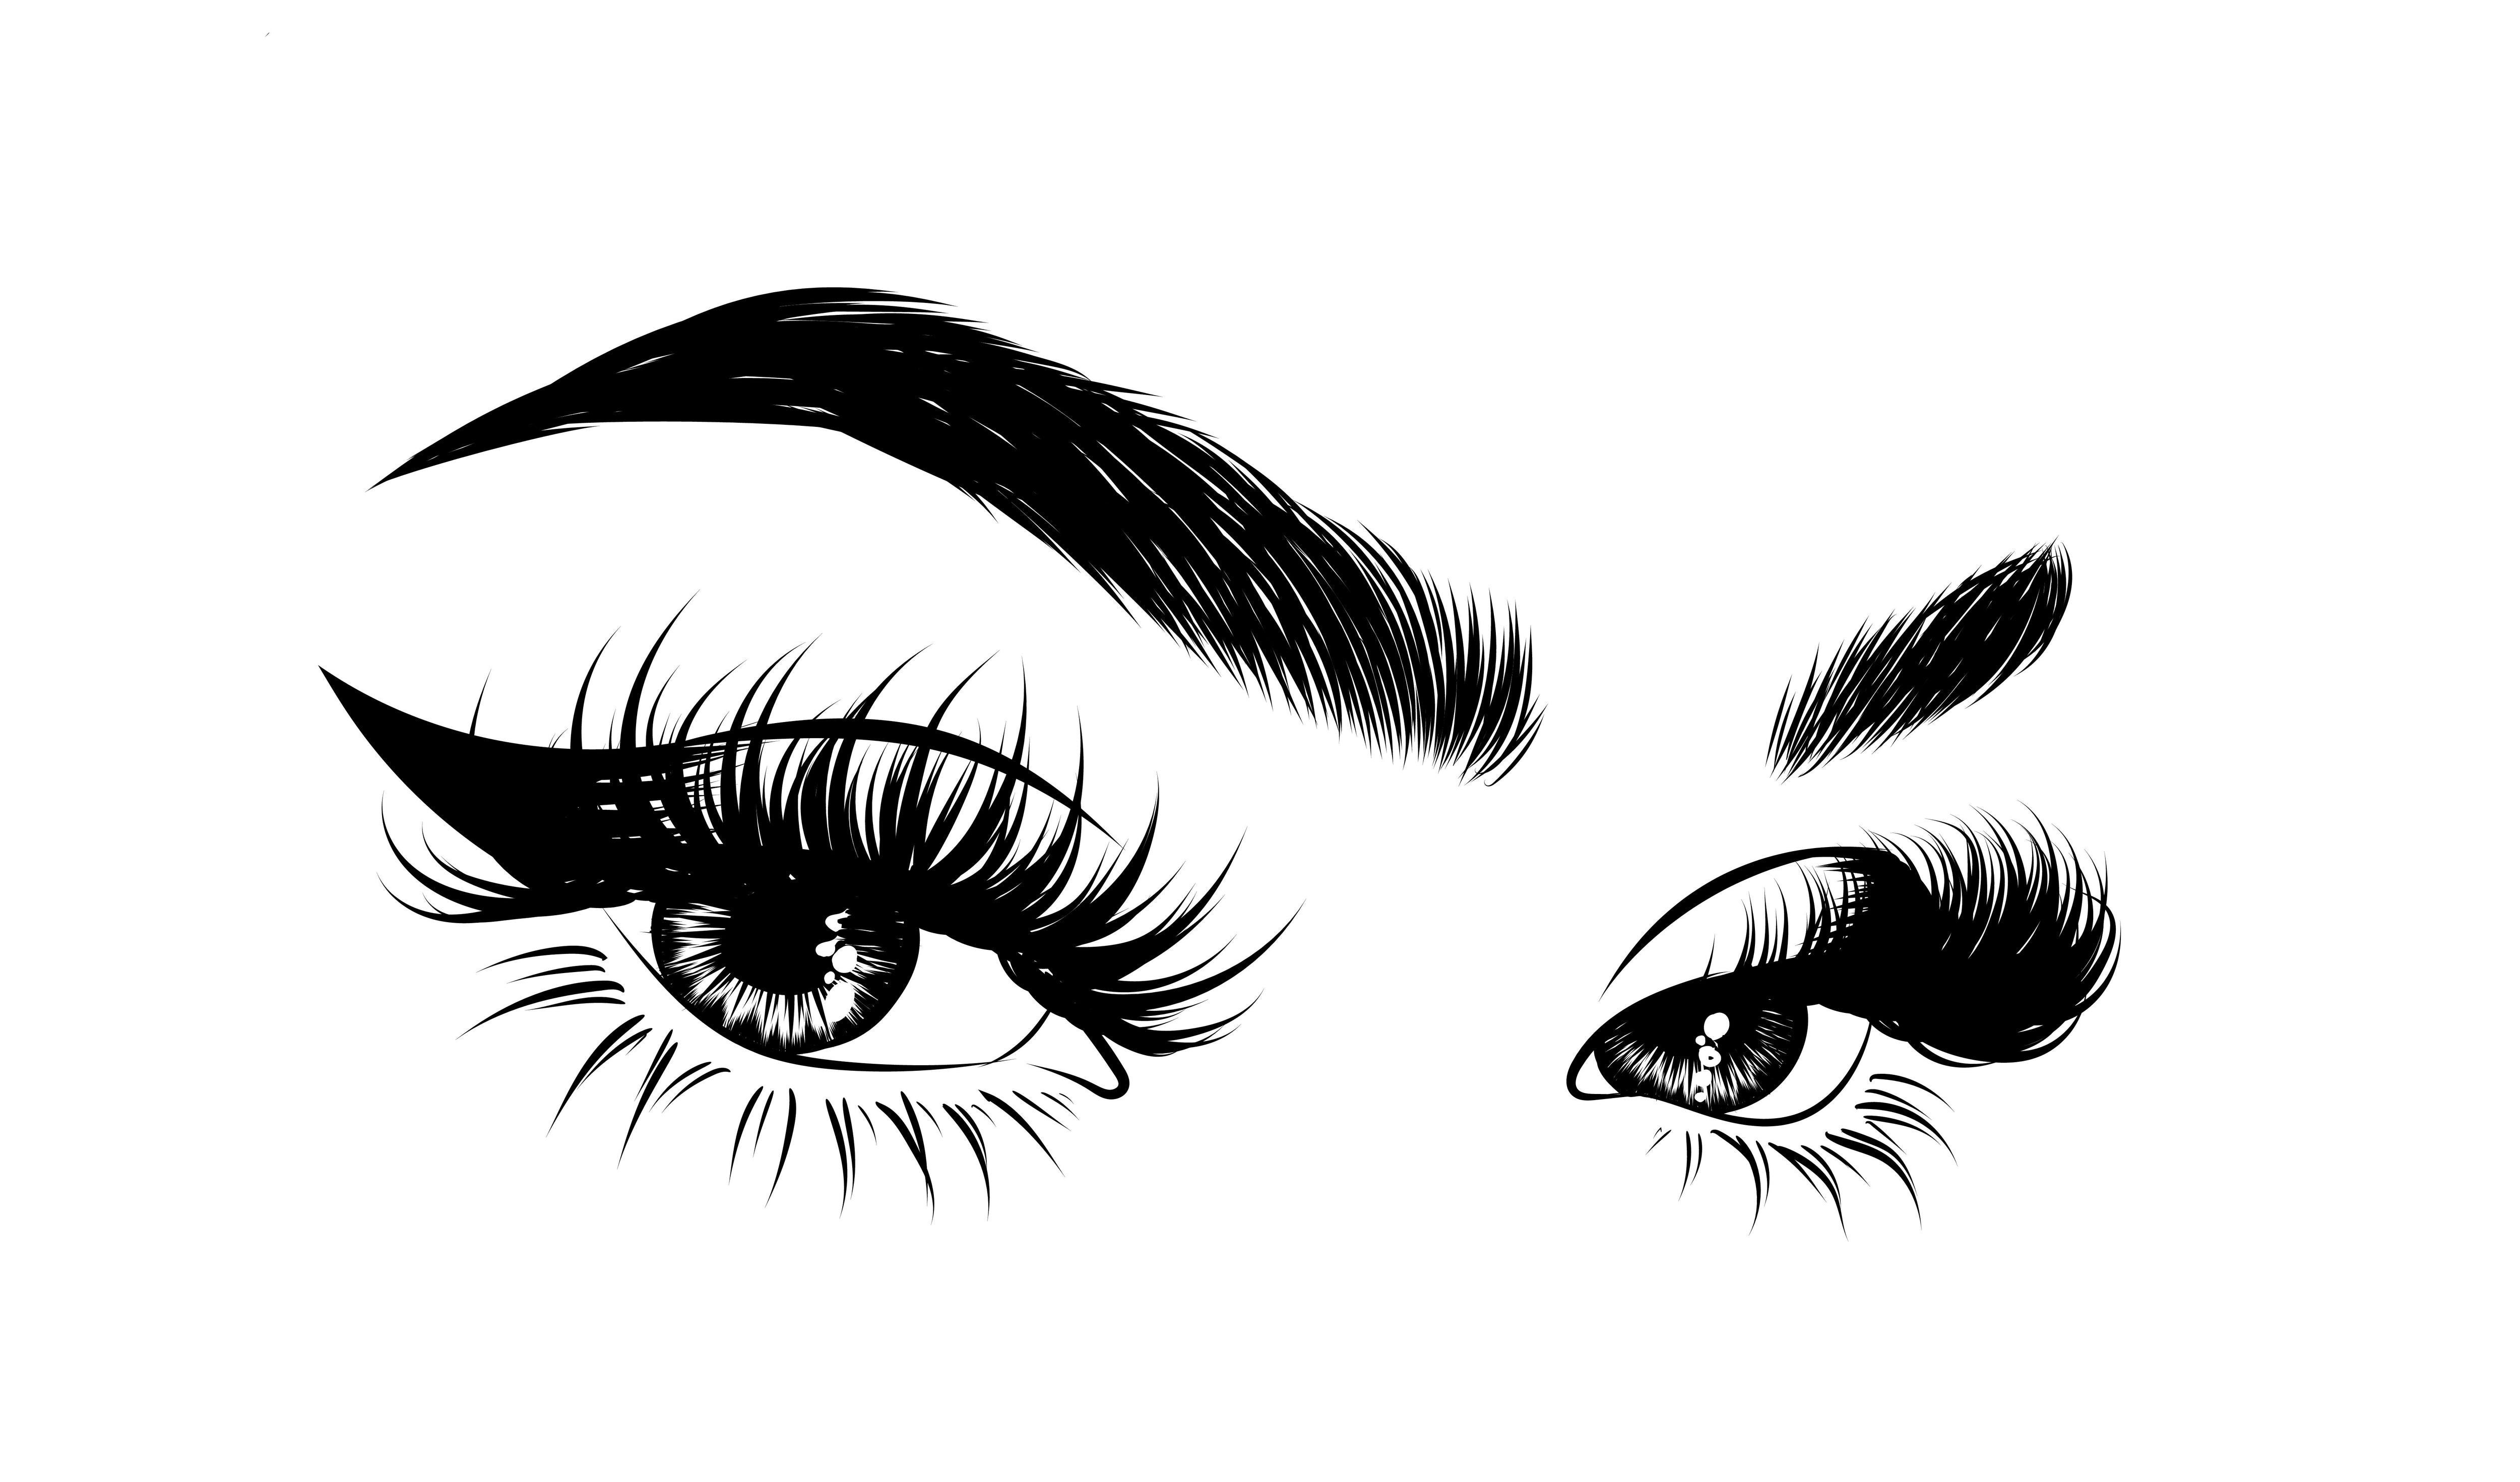
Using Mascara on Lash Extensions
Maybe you’ve got your very first set of lash extensions, or perhaps you’re thinking about getting some. But you’re wondering, “can you put mascara on lash extensions?”
Great question.
And if you’re going to invest money in lash extensions (along with sitting still for that long), you want to make sure you’re taking care of them the right way.
Don’t worry, we’ve got you covered. In this post, we’ll be answering all your burning questions. By the end of it, you’ll be a lash extension and mascara pro.

Can you put mascara on lash extensions?
So, should you wear mascara with eyelash extensions? Or is it a total no-go?
You can wear mascara on lash extensions. When your lashes are fresh, you won’t have a huge need for mascara, but towards the end, you may want to reach for it!
That being said, if you prefer to wear mascara with your lash extensions from the start, you can definitely do so!
Estheticians recommend to avoid applying it to the base, as this can create a clumpy look. So keep it to the tips, and you’ll be golden.
It’s worth pointing out that if you’re opting for volume lashes (the 2D, 3D, or custom-made fans), you probably won’t need mascara. Adding it will likely cause the fans to close and ruin the effect.
Why wear mascara with lash extensions?
Mascara will help darken and add volume to both the upper and lower lashes.
Synthetic lashes are thicker than your natural eyelashes, whereas silk extensions taper out at the ends. Mascara helps give you that extra impact all the way to the tips — perfect for a more dramatic look.
Many women also choose lash extensions that match their natural lash color. Adding a darker shade of mascara allows you to deepen the color as you like.
And like we mentioned above, when your fake lashes are on their last legs and begin to shed, you can fill in the gaps with mascara. They’ll look as good as new!

Which type of mascara should I avoid?
Be careful; if you use the wrong kind of mascara, you’ll ruin your lash extensions.
Here’s what to avoid:
Waterproof mascara
Waterproof mascara is designed to stay put through extreme conditions. You know, like thunderstorms and balling your eyes out on your wedding day. It’s great when you need it, but it’s a no-go when it comes to lash extensions.
It can make your lashes brittle, and it’s extra tough to remove. You need an oil-based makeup remover, which can pull off flares, sometimes your lashes, and the glue holding your extensions in place.
Tube mascara
Although tube mascara can be removed with water, it’s not suitable for lash extensions.
Why?
Because it will stick to them like glue, and water will not be sufficient to get them off once that happens.
Fiber mascara
Like waterproof and tube mascara, fiber mascara is also difficult to remove. Plus, the purpose of fiber mascara is to add length to your natural lashes. If you’ve got extensions already, you probably don’t need it.

Mascara you can use with extensions
Oil-free mascara is best for lash extensions. That means the best mascara for lash extensions is a water-based formula. This is the only safe choice and will keep your lashes in tip-top condition. And it’s perfect for all types of falsies.
If you have sensitive eyes or wear contact lenses, opting for an oil-free mascara is always the best choice. This will prevent unwanted irritation.
What you want is a mascara that glides flawlessly across your lashes and comes off with minimal effort at the end of the day.
When it comes to consistency, you want a mascara that is not too thick or too dry. A thick mascara can cause tension on the lashes, tangling, and clumping.
Choose your brush wisely, and make sure it doesn’t grip your lashes too tightly.

How to safely remove your makeup when wearing lash extensions
Choosing the right mascara isn’t the only thing to consider. If you choose the wrong makeup remover, you can still end up damaging your lashes.
There are many makeup removers and cleansers that contain oil, which you don’t want. A water-based product is what you’re after here again.
The best way to remove your makeup while wearing eyelash extensions is to use a water-based wipe or lash shampoo with a charcoal brush. Avoid cotton pads or balls because they may get lint on your lashes!
Remember, when you take care of your lash extensions and keep them clean, they’ll last longer and look better. So it’s in your best interests to pick the right products and treat your lashes with the love they deserve.

What’s the secret to flawless-looking eyebrows? Good eyebrows have been making headlines in the beauty industry for years now and show no signs of taking a backseat anytime soon. But with so many techniques and products out there, how do you know where to start when it comes to getting beautiful, natural brows? In this article we’ll be covering everything you need to know when it comes to how to get perfect eyebrows naturally, plucking your eyebrows, and eyebrow treatments. Here’s what to do with your eyebrows, broken down into simple, manageable steps. Eyebrow treatments for beautiful brows Here are some of the most popular eyebrow treatments, what the process looks like, and why you may want to give them a try. Threading Threading originated in India and involves the use of cotton thread to roll over the surface of the skin to drive unwanted hair out of the follicle. It’s precise, organic, requires minimal contact with the skin, and involves no nasty chemicals. You can expect results to last for up to two weeks. Waxing Eyebrow waxing uses a thin layer of warm wax over the area of hair you want to be removed. A small strip of fabric is then used to quickly remove the hair. When done properly by a professional, the wax is applied at a temperature that opens the pore and allows the hair to be removed without causing breakage. Waxing is ideal for anyone with extra bushy brows looking to create a strong, sculpted arch line. An eyebrow wax will usually last a minimum of two weeks before the hair starts growing out again. Tinting Tinting your eyebrows involves using a semi-permanent dye in a tone close to your natural hair color and adding it to your existing eyebrow hair. It’s a quick treatment that will create the appearance of fuller-looking, defined brows. Results can last between 1-3 months, this will cut time off your morning makeup routine by eliminating the need for excess products. Microblading Microblading is similar to tattooing and involves a type of semi-permanent makeup used to fill in your brow however you like. Defined, hair-like strokes are created using a needle and brow pigment ink. This will allow you to change the shape of your brows and add more definition wherever you want it. Microblading will take around two hours to complete, and can last anywhere between 18 and 30 months. Top tricks for plucking your eyebrows Plucking is one of the simplest and most common eyebrow treatments out there, but it shouldn’t be underestimated! If you already have luscious brows, lightly plucking your eyebrows may be all you need to get rid of stragglers. And this is all tweezers should be used for—not to shape your eyebrows. Let me share an insider secret with you: one of the best ways to get beautiful brows is to leave them alone! Another great tip is to wait to tweeze as long as possible, and then get all those stragglers in one go. This way, all the hairs will be on the same growth cycle and grow back at around the same time. Don’t worry if you’ve been over-plucking your eyebrows (we’ve all been there). Put the tweezers down for now and let your brows grow out naturally. Use a brow pencil to fill in any gaps—more on that later. How to shape your eyebrows the right way I’d recommend avoiding doing it yourself. Save up the money you need, and invest in a professional service. It'll be much quicker, and you’ll save yourself the drama of it going wrong. You don’t want to spend all that time growing your eyebrows out only to mess them up! Shaping your eyebrows is more complicated than you may think, and a brow specialist will have a ton of knowledge and should know how to enhance your natural arch line and give you the most flattering shape. Avoid getting certain product on your brows This might be a random fact, but did you know that products like moisturizer, SPF, and foundation can all dislodge your hairs and inhibit growth? Yes! Of course, it’s difficult not to get these kinds of products on your brows when you’re applying them to your face. So when you’re done, gently wipe away any product from your brows. Problem solved! Experiment with eyebrow products The market is saturated with brilliant eyebrow products from pencils to pens, powders, gels, mascaras, and more. Every product will work differently for different skin types and can help you achieve various results. So, the first step is to think about what your end brow goals are. If you want to fill in sparse spots and add some definition, a brow pencil and spoolie brush will work well. If you’re trying to tame your hairs and lightly shape them, a light brow gel might do the job. And if you have no idea where to start, then experiment with different products. See what you like and what works well with your natural features. Have fun with it! How to fill in eyebrows naturally Choose the right shade There are so many shades of blond and brown, which means you can’t always depend on a “one color fits all” kind of product. Fortunately, the Brow Arcade has four colors to choose from, so you can find the best shade to match your brows! When testing other products, the best approach is to try out different shades and see what works for you. As a general rule, those with light eyebrows should go for one shade darker than their hair color, while women with dark brows should go one shade lighter than their hair. If you have cool undertones you should use products with an ashy color, and if you have warm undertones you should use golden-toned colors. Draw lightly Remember, it’s easier to add product than it is to remove it, so start lightly and gradually build up from there as needed. How to brush your brows While filling in your brows you can brush them in a downward direction with a spoolie to help you spot any patchy areas and fill them in. Brushing the hair down exposes the skin and allows you to draw directly on it. This will give you added definition. Once you’re done, remember to brush your brows back upward! Add brow gel/mascara If you’re looking to darken the look of your eyebrows, then mascara is the best product to swipe on for a look that is bold but believable. A brow gel should be the final thing you add to your brows. But if you already have fabulous natural arches, mascara might be the only thing you need for beautiful brows. Complete the look by making your brow bone pop This is the final step when it comes to perfecting your beautiful brows. Once you’re done filling them in and layering your chosen products, you want to make all your hard work pop. If you really want to spotlight your brows, opt for a highlighter and swipe it just underneath your arches. For a subtler look, use a concealer one shade lighter than your skin tone. This will still brighten up your brow area but create a more natural look. And that’s how to get perfect eyebrows naturally!
We all have that one girlfriend who never wears foundation, and is blessed with immaculate, glowing skin. But we’re not all that lucky, right? Foundation is a key makeup must-have in most women’s toolkit. Why? Because it creates a seamless base to then apply the rest of our makeup. Not to mention it covers a multitude of problem areas including spots and acne, uneven skin tone and hyper-pigmentation. But what if we told you that the less cover-up you wear, the less you’ll need to cover up? It’s like a vicious cycle. If you keep on wearing foundation, you’ll need to keep wearing it... until you finally wean yourself off of it. And yes, flawless skin really is possible without foundation. But it’s easy to talk about ditching foundation for good, and a whole other ball game actually going through with it. Whether you want to give foundation up for good, or just take a short break from it, there are some great alternatives to achieving the look you want without caking your face in makeup. So, if you’re ready to embrace that natural French beauty look and channel the less is more mentality, keep reading. What are the benefits of no foundation makeup? Have you noticed your makeup looking fab in the morning, but by lunchtime it starts to look a little patchy, and by the afternoon it’s looking seriously greasy? We’ve all been there. This is because most foundations are high in pore-clogging ingredients like mineral oil or silicones. This is what gives them that great texture. But it’s not good news for your skin, unless congested pores, inflammation, and breakouts are what you’re looking for... We don’t think so! So, by using less foundation (or removing it from your makeup routine altogether) you’ll gift your skin a much-needed break. Even if you only do this once or twice a week, or every other day. There’s no guarantee that your skin will look amazing all the time (there are so many other factors involved) but it will definitely help it look fresh and healthier. So, here are some alternatives to help you achieve flawless skin without so much makeup. Up your skincare game Chances are, you wear foundation because it makes you feel more confident in your appearance, right? It covers your perceived imperfections. It’s probably not because you enjoy that oily/cakey texture that stops your skin from breathing and stains all your beautiful white clothes! So, if you didn’t have those “imperfections,” and had gorgeous glowing skin like a runway model, would you bother wearing foundation? Probably not. Well, a lot of your skincare qualms can usually be solved by upping your skincare game. Most women aren’t using the right products, or aren’t using them consistently to see an improvement. That means committing to removing your makeup each night, cleansing and moisturizing, which will let your skin breathe. And in the morning, cleansing, moisturizing, maybe applying some face oil, and definitely some SPF. Plus, exfoliating once or twice a week. Doing this religiously every day or night should energize your skin, help it renew itself, and glow with or without makeup. What if I have uneven skin tone or hyper-pigmentation? Great point. Many women with darker skin suffer from hyper-pigmentation, and the struggle is real. Foundation is a miracle base to even things out. So, is there an alternative? Yes! There are many brightening and illuminating products out there specifically designed to target uneven skin tone, hyper-pigmentation, and even scarring. Plus, there are concealer-like products to target specific problem areas. Different tones of blemishes each have a corresponding product designed to target them. Take a look at what’s on the market right now. We guarantee there is a product designed specifically for your skin and area of concern. The great thing about many of these brightening and illuminating products is they’re rich in vitamins and minerals which are brilliant for repairing cells and creating a protective barrier for your skin. No base makeup is looking pretty achievable right now, isn’t it? Use a tinted moisturizer instead We adore the natural look and would love nothing more than to see every woman covering up less and embracing their natural beauty more. That being said, we understand it’s challenging and a little scary—especially at first!So, if the thought of replacing foundation with skincare is daunting, don’t worry. Take it in baby steps. How about trying a tinted moisturizer like a BB cream instead? These are little tubes of magic, and particularly great for adding light coverage that won’t melt off your face on those warmer days. Not only will it smooth your skin tone and cover imperfections, but it will also help your skin breathe. Add a tiny bit of bronzer or highlighter on your cheekbones for some extra glow, and you’ll forget all about that thing called foundation. Try a sheer concealer-powder Concealer makes a great substitute for foundation, and you’d be surprised how little of it you need. After you’ve completed your skincare routine, just dab a bit of concealer under your eyes and over any other small blemishes. A creamier texture is easier to blend than a powdered one, especially on this area of the face. Next, apply a thin layer of concealer powder to even everything out. You’re still wearing makeup, but a much lighter base. That means way less time in front of the mirror for you, plus healthier and happier skin. A winning combo! Embrace the natural look! It’s no secret that French women are all about minimal makeup. They manage to look both chic and effortless. Their secret? Minimal foundation, if any. Yes! French women steer clear of that cakey look opting for a little swoosh of concealer or powder, then bronzer or highlighter to contour with. Natural skin paired with a swipe of sexy eyeliner is très chic, don’t you think? Don’t feel pressured to throw out your foundation right away. How about trying one of the suggestions above for just one day, and see how you look and feel? If you like it, try it for a few more days, and go from there. If you’re extra self-conscious, try this out on the weekends or holidays when you know you won’t be running into too many people. Give yourself the time and space to adjust and feel comfortable in your skin again.

We’ve all opened a moisturizer or applied a lip gloss and had that feeling that something doesn’t look quite right. The color has changed, the consistency is off, or you actually find your skin being irritated after you apply it. But you can’t bear to throw it away! The jar is still half-full, or it’s your favorite lipstick, and even though your intuition is telling you something’s off, you dismiss that thought. Surely it’s better to keep using this product until it’s finished instead of wasting it? So, do makeup products actually have an expiry date? How do you know if your beauty products have gone bad? Do unopened makeup products expire? How can you check the expiry dates of your products? And is there any harm in using an expired product? All great questions, and we’ll be answering them all in this article! Here’s everything you need to know about makeup expiry dates. How long do beauty products last? There is no definitive blanket answer, but here’s a general guide for how long different types of beauty products last. Makeup that you use around your eyes Mascaras and liquid liners have the shortest shelf life and will generally last between three and six months before they need replacing. It’s really important you adhere to this to avoid any nasty eye infections. Pencil eyeliners have a longer shelf life and can last up to a year. Sharpening your liners regularly will shave off any bacteria that has built up and help you avoid eye infections. Liquid foundation Water-based foundations can last up to a year while oil-based foundations have a slightly longer shelf-life lasting up to 18 months. Moisturizers Depending on how fresh the ingredients are, moisturizers can last between six months to a year after being opened. Eye creams, face masks & serums These will all last between six months and a year. Lip products A solid lipstick texture will last between one and two years, while liquid lipstick and lip gloss will generally last between six months to a year. A lip liner can last up to a year and should be regularly sharpened the same way as an eyeliner. Cream-based makeup Cream concealers and blushes can usually last between six months to a year. Powder products Bronzers, powder blushes, powder foundations, and setting powder can all last up to two years. Nail polish Nail polish will last indefinitely if it’s unopened. But once opened, it will usually have a shelf life of two years. Around this time (or sooner) certain ingredients will begin to evaporate which will cause it to thicken. Makeup brushes Brushes can last a long time as long as they’re properly looked after. That means washing them every month to remove bacteria and build up. How to check the expiry date of cosmetics The best way to figure out if a beauty product is expired is to use your common sense. Ask yourself the following questions: Does it look right? Does it smell right? Has the texture changed? And check the expiration date—every tube or jar will have this clearly written on it. What you’re looking for is the “period after opening” number. This will be written as “6M” or “12M” on the product somewhere. This essentially tells you how long you can use this product safely after you open it. Usually, it will be fairly obvious if a product has gone off. For example, mascara will clog. Pencils will dry out. Creams and moisturizers will change in consistency or color and may even change in smell. What to do with expired beauty products: If in doubt, throw it out! Do unopened makeup products expire, or is this just an urban myth? Most products on the market have a shelf life of over 30 months when left unopened. But this really depends on the product in question. As mentioned already, some products have active, unstable ingredients in them that go off quicker than other ingredients. So you’d be wise to still practice caution before going ahead and using any product that has been hanging around in your beauty drawer for a while. How to extend the shelf life of your beauty products Did you know that the way you store your beauty products can actually extend their shelf life? Yes! So, are you storing and looking after them the right way? Here’s what NOT to do: Keep your makeup products somewhere humid (i.e. on a shelf in the bathroom) Keep them somewhere warm or in direct sunlight (on a windowsill) Dip dirty fingers, brushes, and sponges into your makeup pots Share your makeup with anyone else This will encourage bacteria and mold to thrive, and wreak havoc with formulas. Here’s what you should be doing to extend the life of your makeup: Keep your products somewhere cool, dark, and dry (not in the fridge though!) Clean your makeup tools regularly Use a tool to scoop out product instead of your fingers Wipe your lipstick after each use to remove bacteria Close lids and tops securely after using them Go for smaller product sizes if you find you’re not getting through them How to keep your beauty products organized As discussed, the period after opening symbol (PAO) is a great indication of how long a product will last before going bad. But sometimes, this will be located on a box and not on the actual product. On top of this, it’s difficult to remember when you bought and opened all your products! To stay on top of things, add a small sticker to each product with a date on it for when you probably need to throw it out and replace it. Can I still use expired beauty products? What happens if you use expired makeup? You might think there’s no harm in using an expired product, but you’d be wrong. But the worst-case scenario is you can break out in spots, have an allergic reaction, or give yourself an infection. A 2013 study found 70% of women used some type of expired product in their makeup routine—mostly eye makeup (mascara, eyeliner, eye shadow). The researchers sampled the eye makeup for contamination, and found that 67% of the products were contaminated! Yikes. It’s really not worth the risk ladies. Set aside a budget for investing in makeup as and when you need it and release the guilt of throwing away a half-used product. Need a handy reminder when it’s time to replace your makeup? Let’s be honest, life is hectic. In a perfect world, we’d all add expiry dates to our makeup products, and we’d always remember to replace them. But most of us have so much going on that best practices like this get forgotten. That’s why we’ve created a handy subscribe and save makeup subscription option for all our products. You’ll save money on our makeup, and we’ll deliver a replacement product automatically at the time increments you choose!